이전에 작성한 포스팅 “IMS with TS 회고록”에서 살펴봤던 문제를 해결하면서 다시 한번 TypeScript를 적용한 React 프로젝트를 만들어봤습니다.
하지만 코드를 최대한 유지 보수에 용이하도록 작성하려고 노력했으나 아쉽게도 여러 방면에서 아직 많이 부족해보입니다.
따라서 이러한 방식으로 진행해보려고 합니다. (이번에는 처음으로 Tailwind를 사용해서 구현해봤습니다. ㅎ_ㅎ)
1. 현재는 기능이 모두 구현된 상태이므로 이번 포스팅에서는 개발 과정에서 어떤 어려움을 겪었는지를 우선 정리하겠습니다.
2. 다음으로 어떤 방식으로 코드를 리팩토링할 것인지에대한 방향성을 제시해보겠습니다.(리팩토링하는 과정도 중요한 경험이니까요)

github에서 브랜치를 두개 나눠서 리팩토링 이전의 코드는 그대로 유지하려고 합니다.
새로운 아이디어가 생기면 적용해보기 위해서요!
1.IMS with TS (version 2) Demo
우선 어떤 기능들을 구현했는지 사진으로 살펴보고자 합니다.
지금부터는 제 생각을 가감없이 표현하기 위해 말을 편하게 하겠습니다!
1-1. Add 페이지
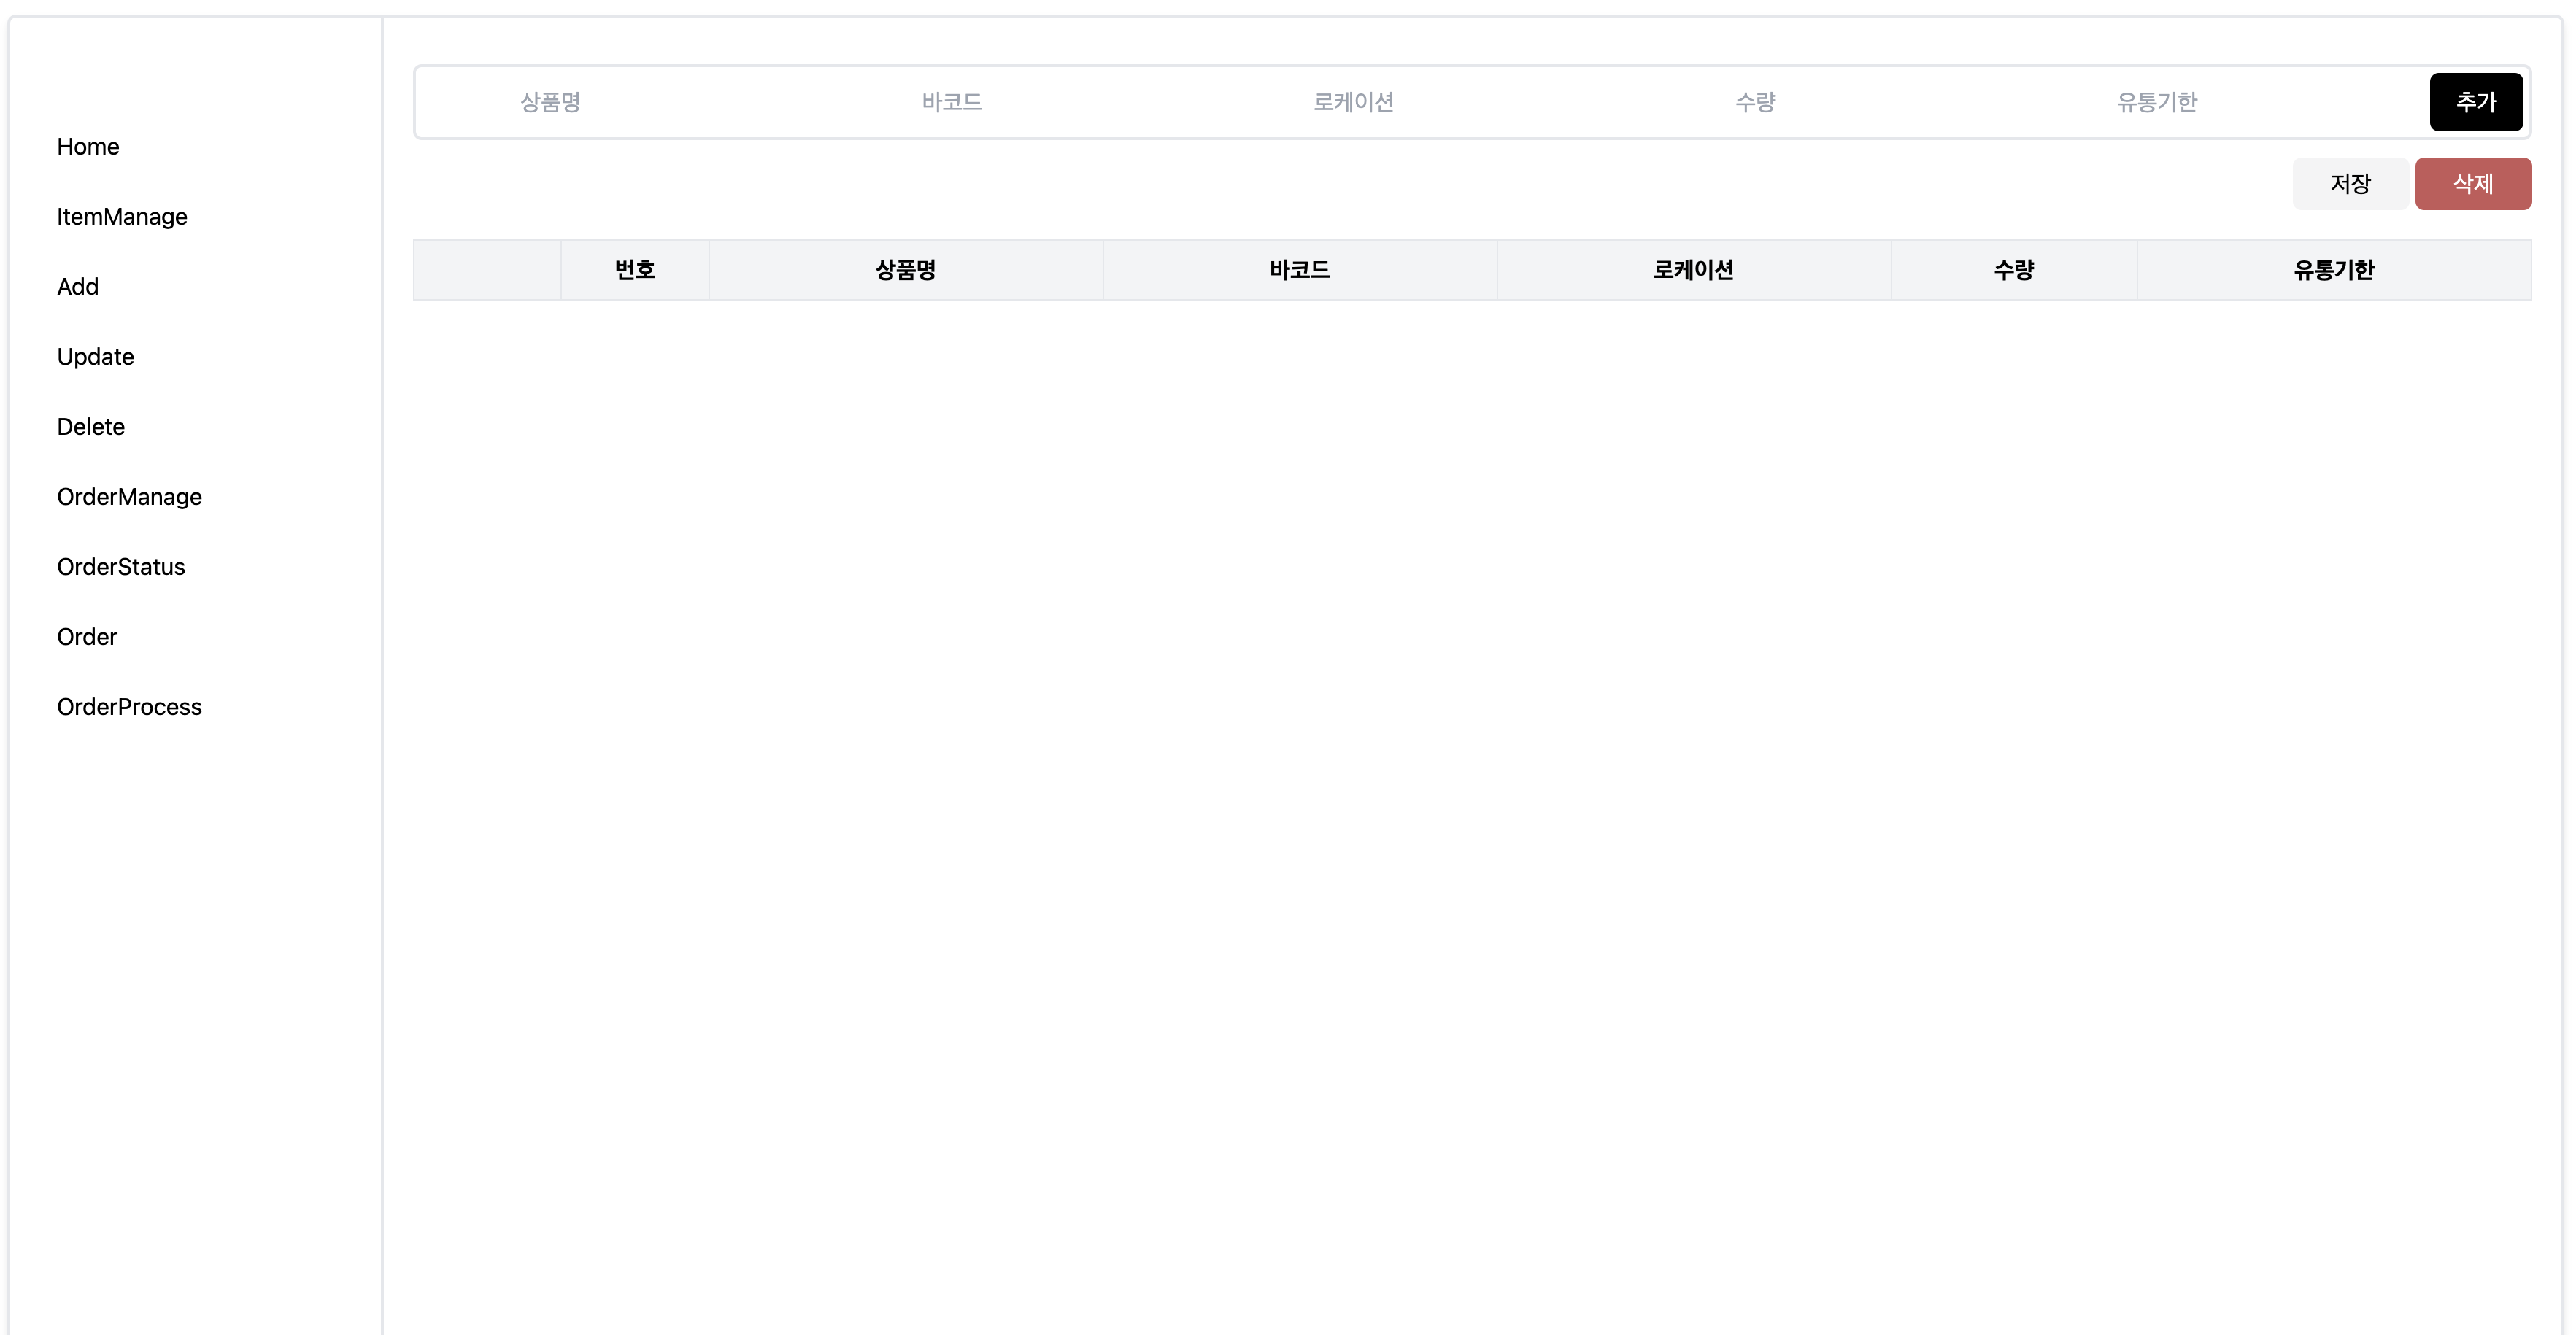
위 사진은 Add 페이지의 처음 화면이다.
여기서 필요한 기능을 정리해보자.
1. 사용자로부터 상품의 기본정보(상품명, 바코드, 로케이션, 수량, 유통기한)를 입력받는다. 이후 추가 버튼을 클릭한다.
2. 사용자가 직접 추가한 상품은 하단 리스트에 하나씩 추가된다.
3. 사용자는 리스트에서 checkBox를 클릭 & 삭제 버튼을 이용하여 리스트에 추가된 상품을 삭제할 수 있다.
4. 사용자가 최종적으로 저장 버튼을 눌러야만 IMS Mock Data에 상품이 추가된다.
(IMS Mock Data는 현재 IMS에 등록된 모든 아이템들의 정보를 가지고 있으며 이제부터는 itemList라고 하자)

1-2. Update 페이지
다음으로는 Update 페이지의 화면 구성이다.

필요한 기능을 정리해보자.
1. 사용자로부터 상품의 이동 정보 (이동 로케이션, 수량)을 모두 입력받는다.
2. 이후 저장 버튼을 누르면 이동 정보를 바탕으로 itemList가 업데이트된다.


만두 상품의 이동 정보를 확인해보면 상품명이 같더라도 수량이 더해지지 않는다.
(상품을 구별하는 요소는 바코드 & 유통기한 & 로케이션이기 때문이다.)
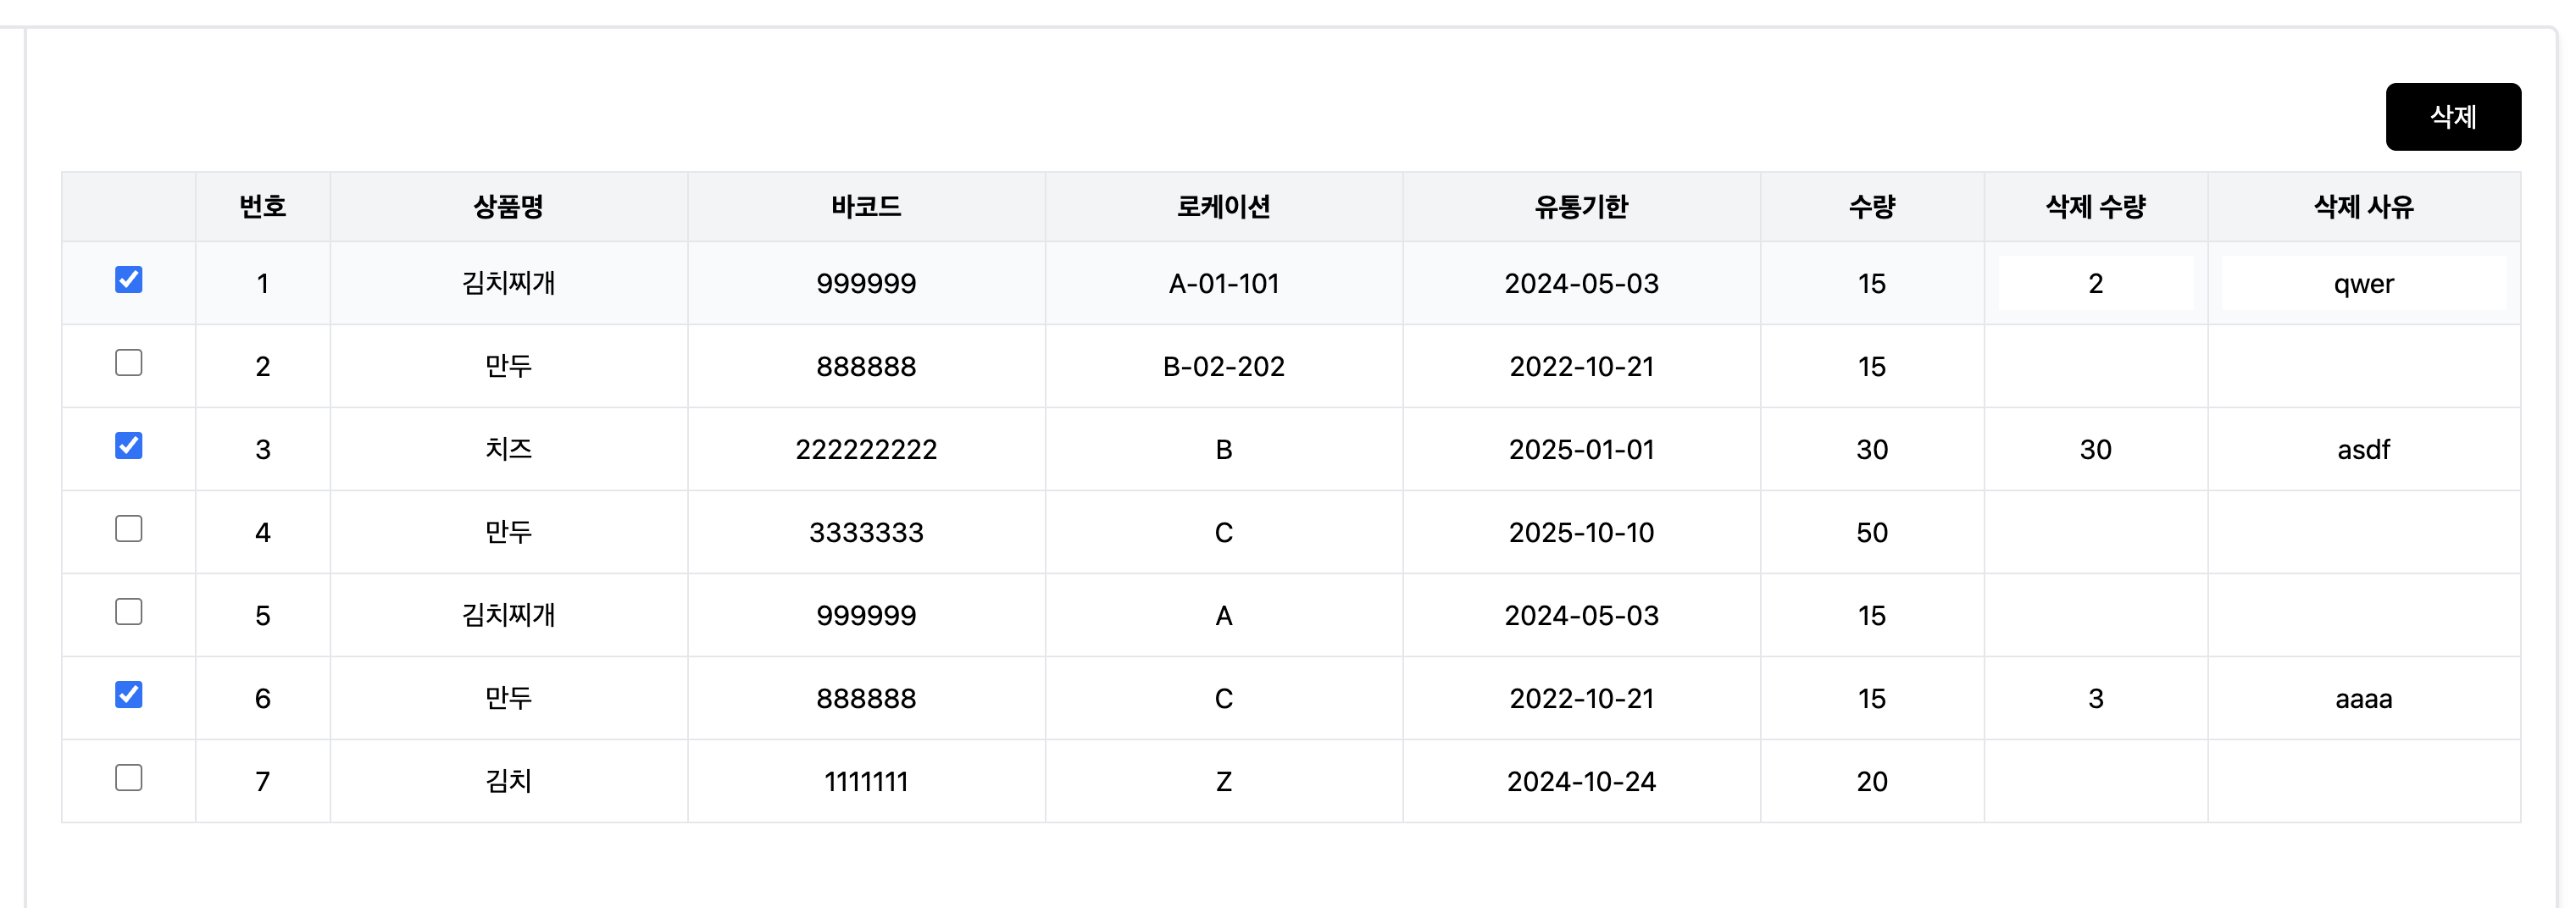
1-3. Delete 페이지
다음으로는 Delete 페이지의 화면 구성이다.

필요한 기능을 정리해보자.
1. 사용자로부터 삭제 수량과 삭제 사유(삭제 사유는 optiaonl)를 입력 받는다.
2. 삭제 버튼을 누르면 itemList에서 삭제된다.

1-4. Order 페이지
다음으로는 Order 페이지의 화면 구성이다.

주요 기능을 정리해보자.
1. 사용자로부터 지시서의 기본정보(지시서 생성 일자, 물류 수령 날짜, 지시서 수신지, 지시서 발신지) 데이터를 입력받는다.
2. 이후 지시서 생성 버튼을 클릭하면 지시서 생성 페이지가 화면 가운데에 보여진다.
3. 해당 화면에서 지시서 수신지에 요청하고자하는 상품을 상품명과 바코드를 기준으로 검색한다.
> 이때 검색 대상은 유효한 데이터만 취급해야하므로 별도의 Mock 데이터에 취급 가능한 상품 정보(바코드, 상품명)를 관리하고 이를 기반으로 동작한다.
4. 검색된 대상의 요청수량과 데드라인 유통기한을 입력받아서 지시서 리스트에 추가한다.
5. 하단에 리스트에서는 추가된 상품들을 보여준다.
6. 리스트에서 삭제 버튼을 클릭하여 특정 상품을 지시서에서 삭제할 수 있다.
7. 해당 페이지를 나가면 입력한 정보를 기준으로 지시서가 생성된다.
8. 리스트에서 지시서를 선택하여 삭제할 수 있다.
9. 상세보기를 통해 지시서 상세 페이지에서 정보를 확인할 수 있다.
10. 지시서 수정 버튼을 누르면 사용자로부터 데이터를 입력받아서 지시서 수정을 진행할 수 있다.

위 사진에서는 사용자로부터 지시서 기본정보를 입력받아 지시서 생성 버튼을 누르는 과정을 보여주고 있다.
버튼을 클릭하면 생성 페이지로 이동된다.
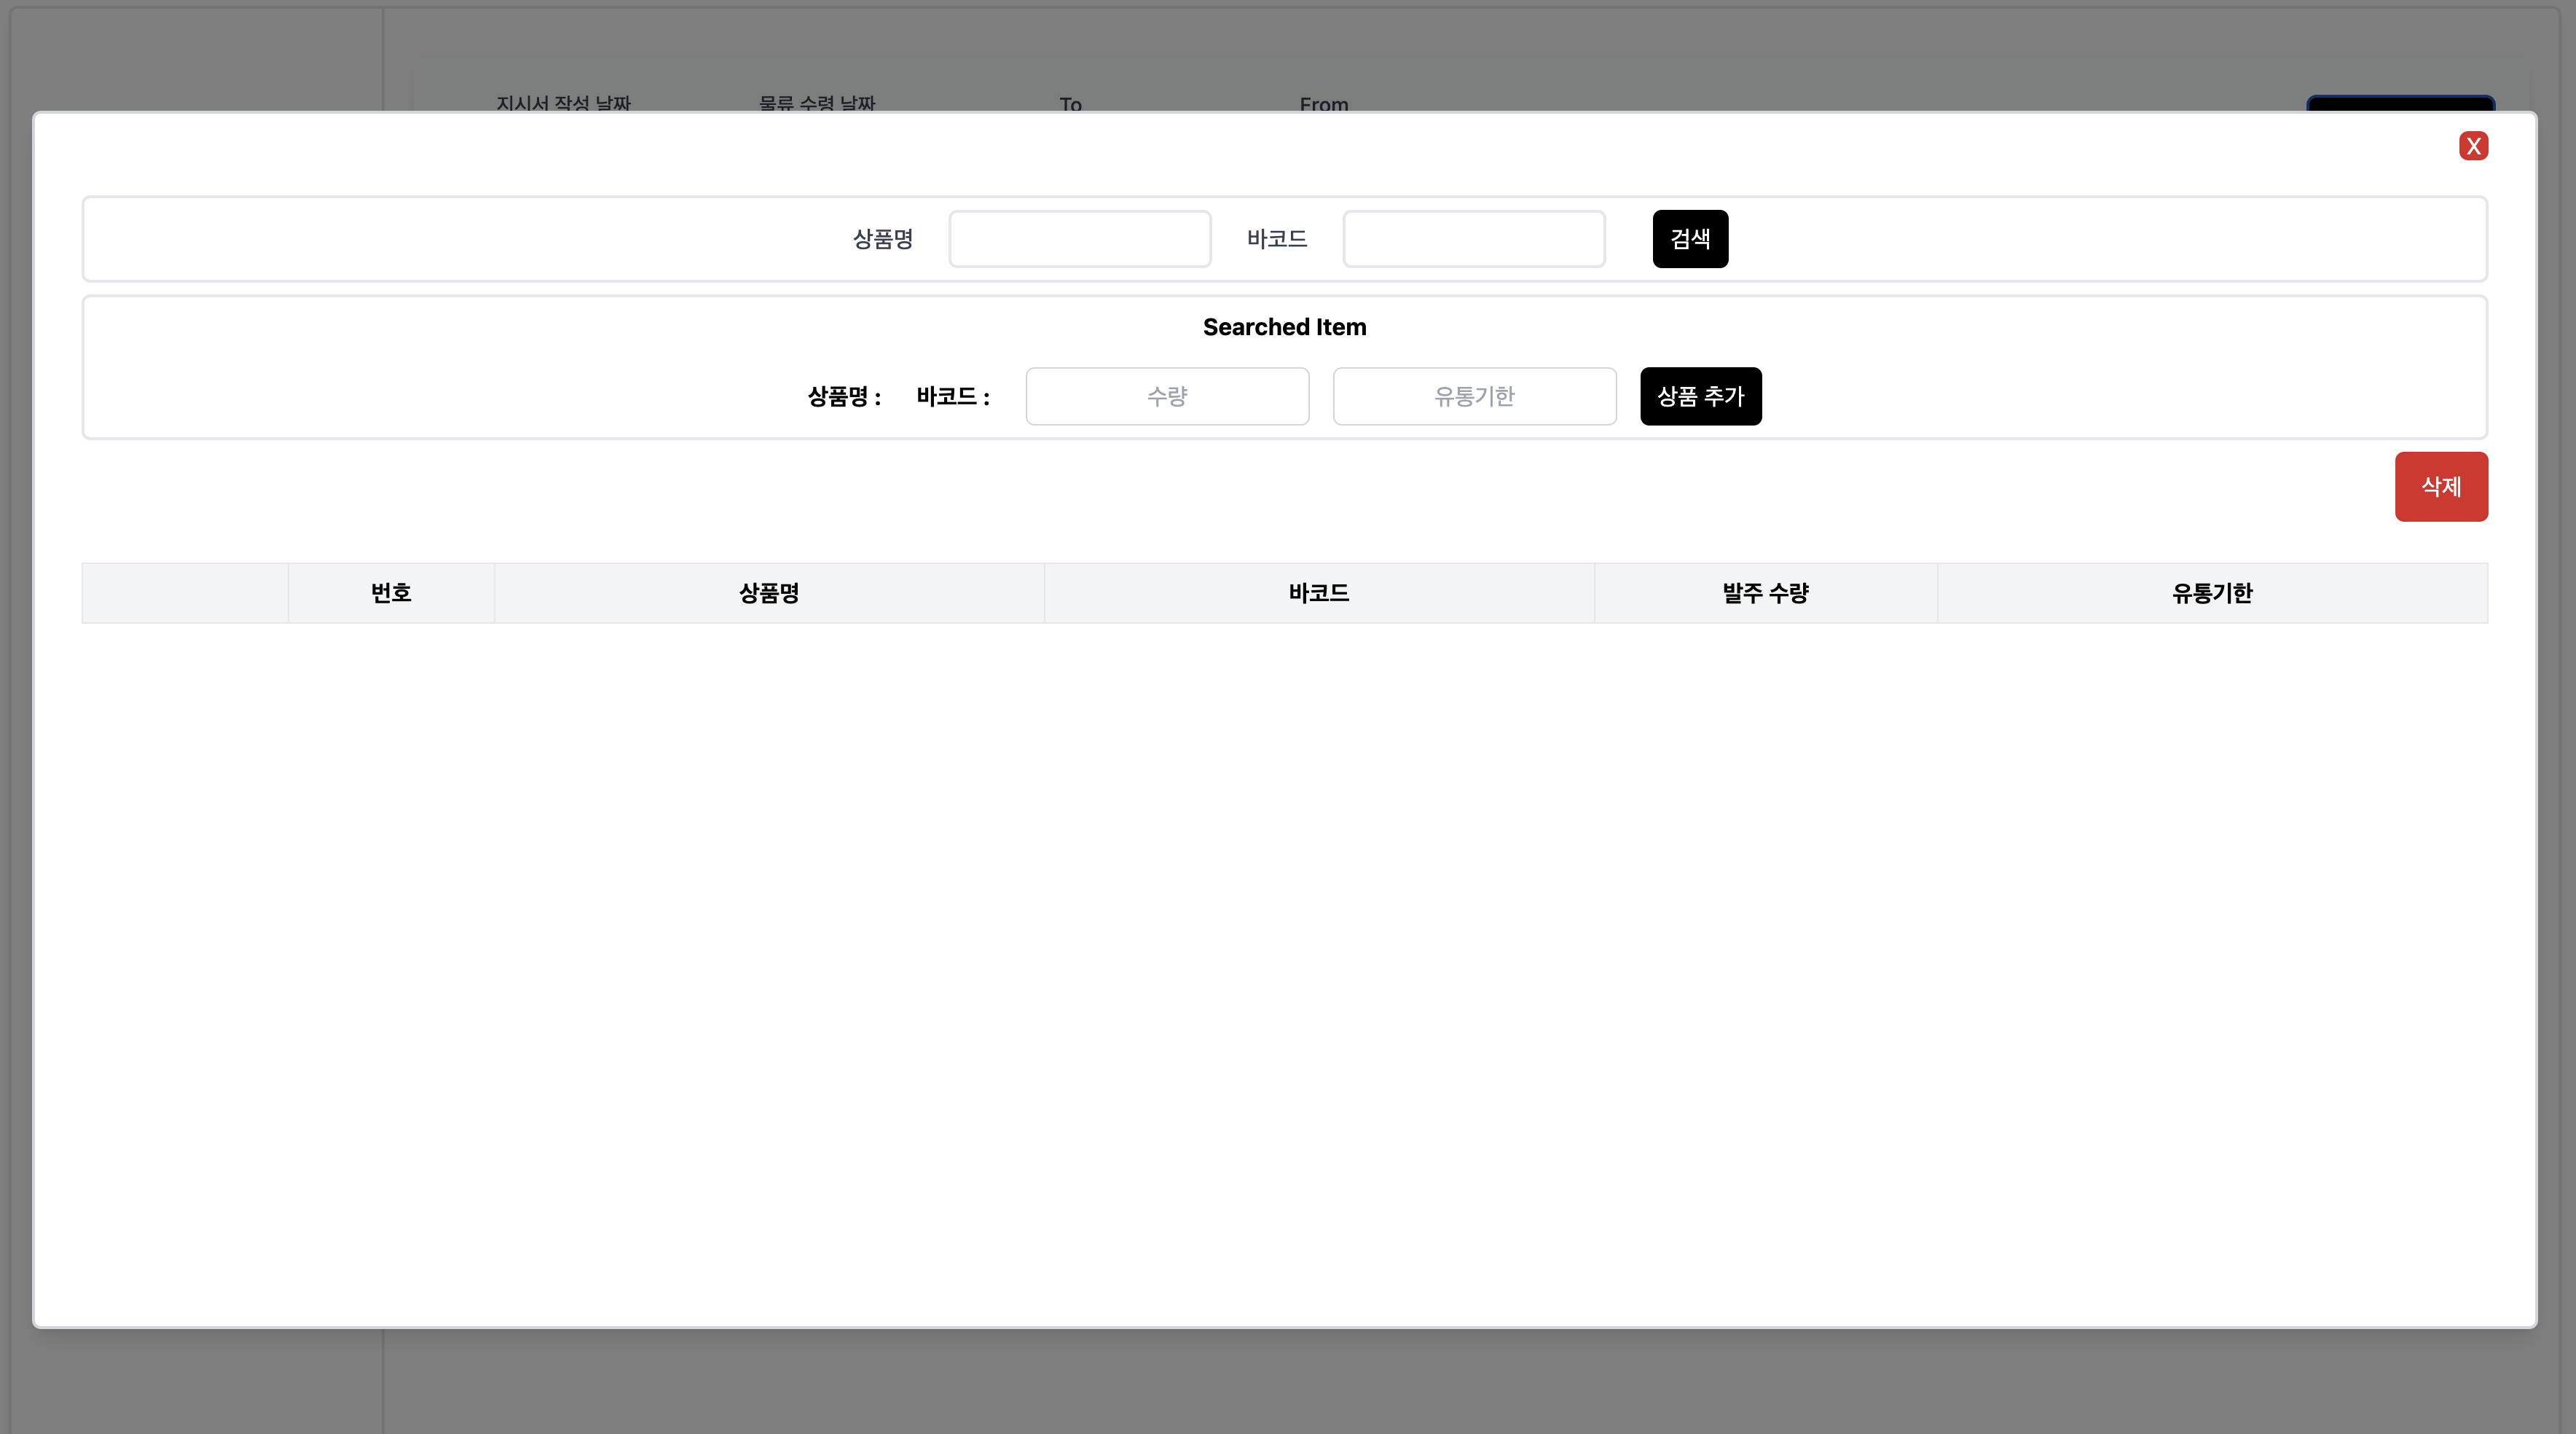
다음으로는 지시서 생성 페이지에서 동작 과정을 사진으로 보여주고자 한다.
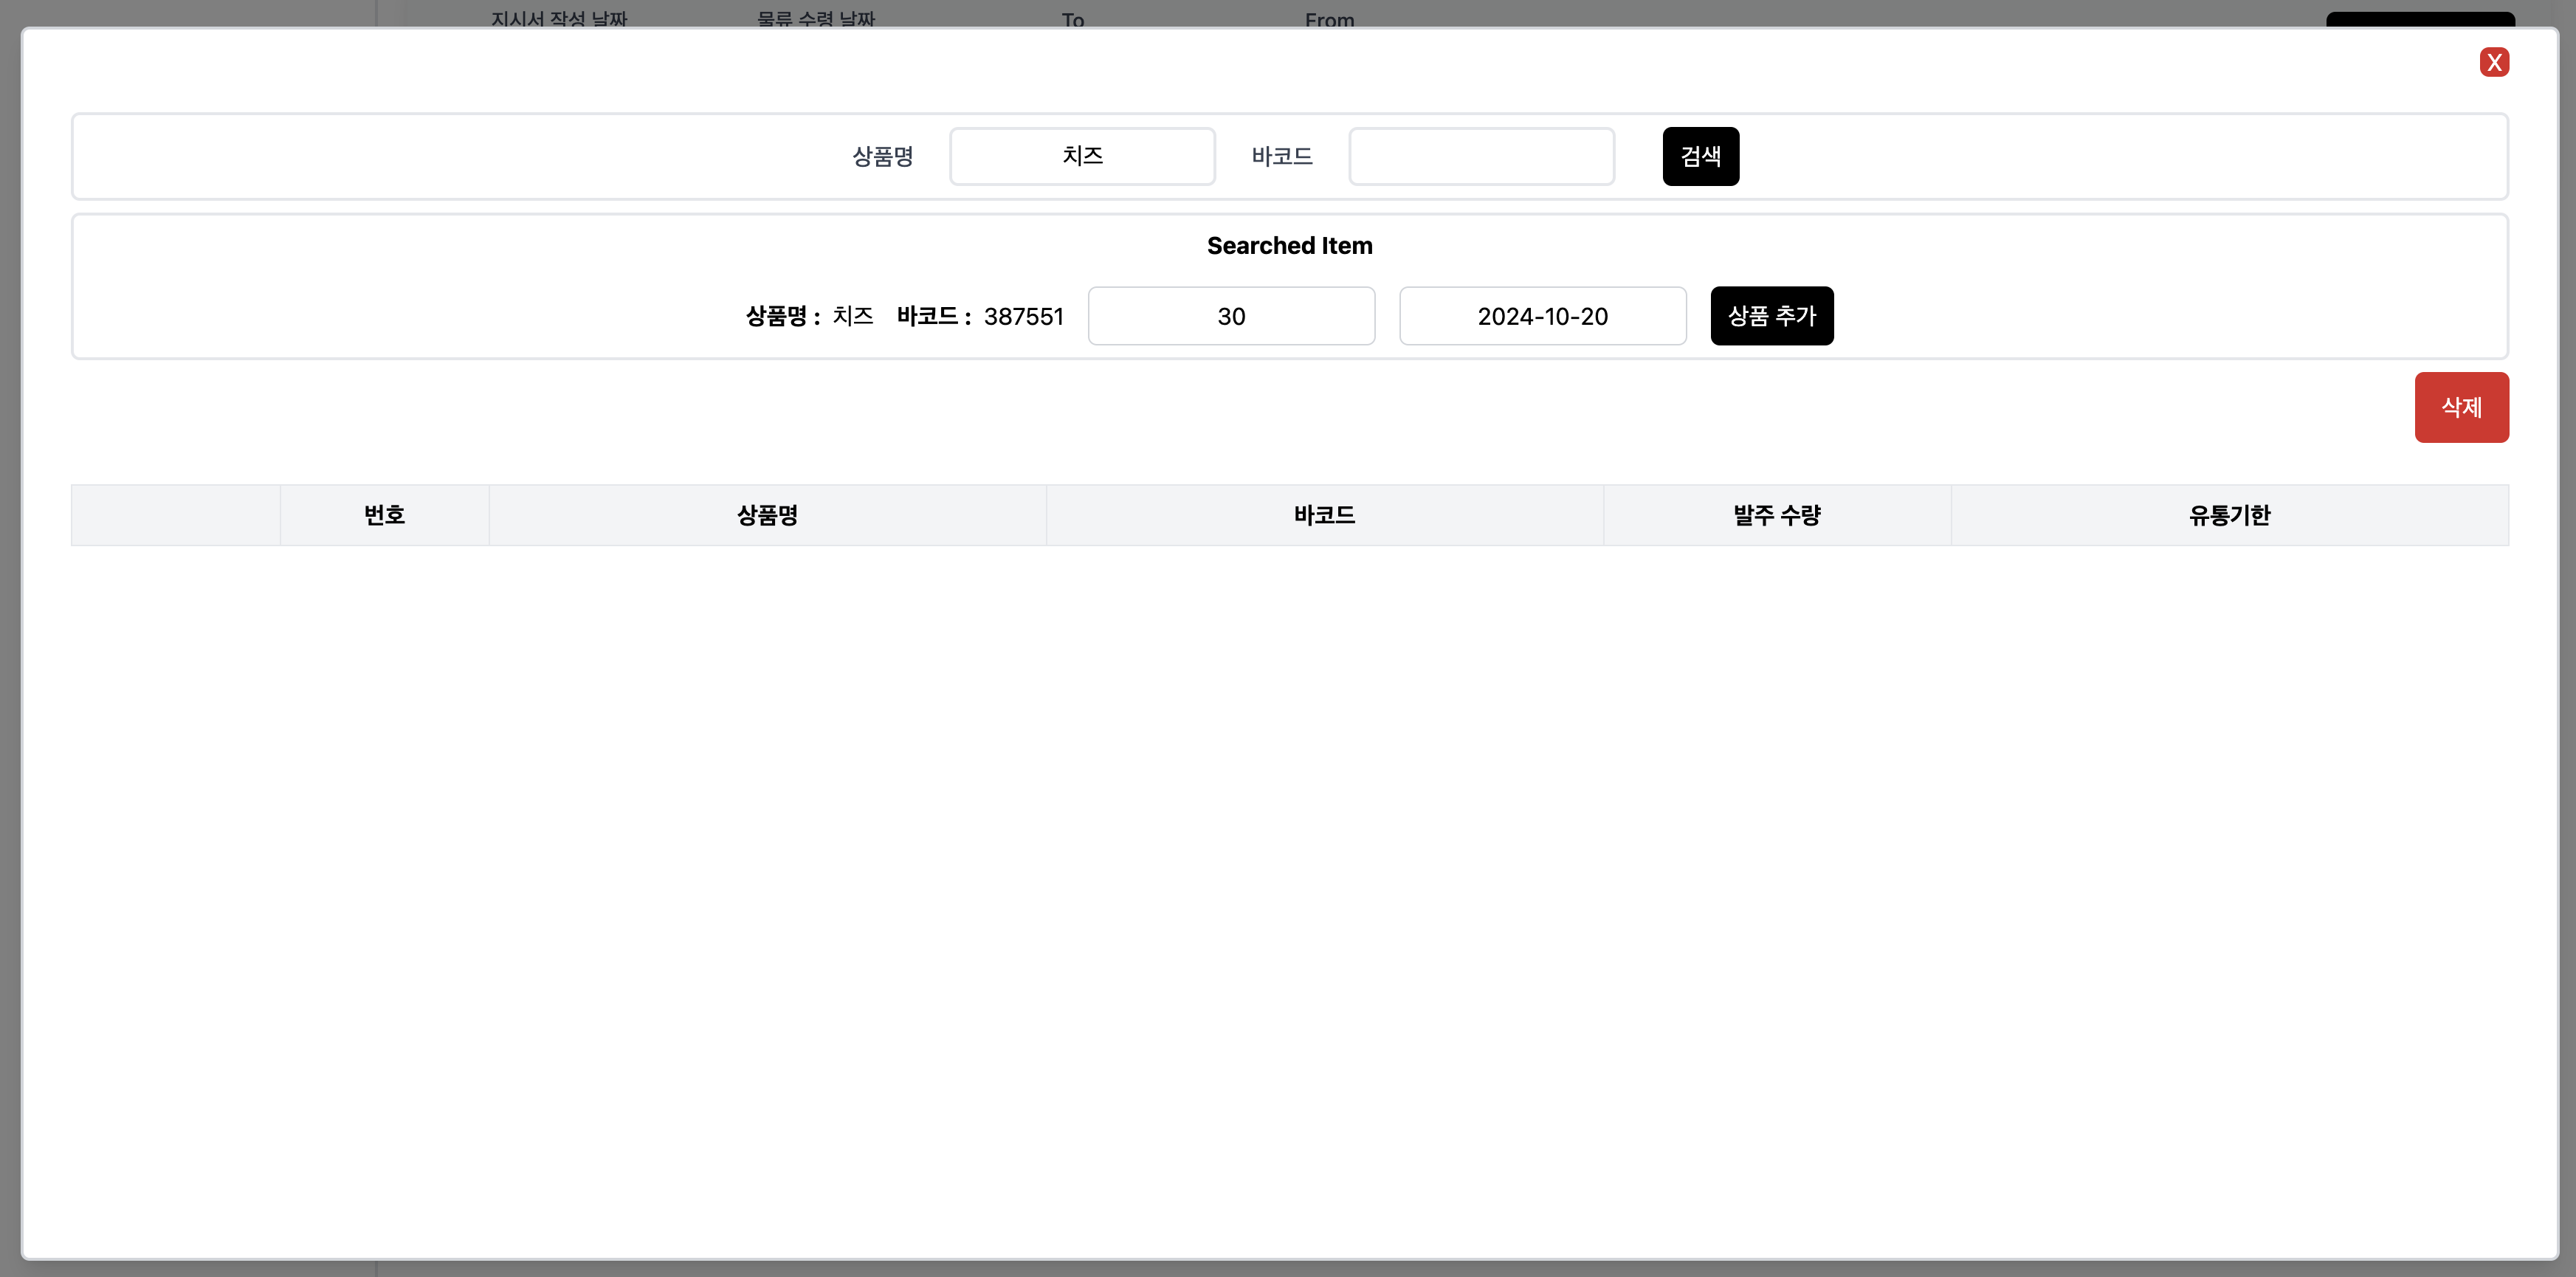
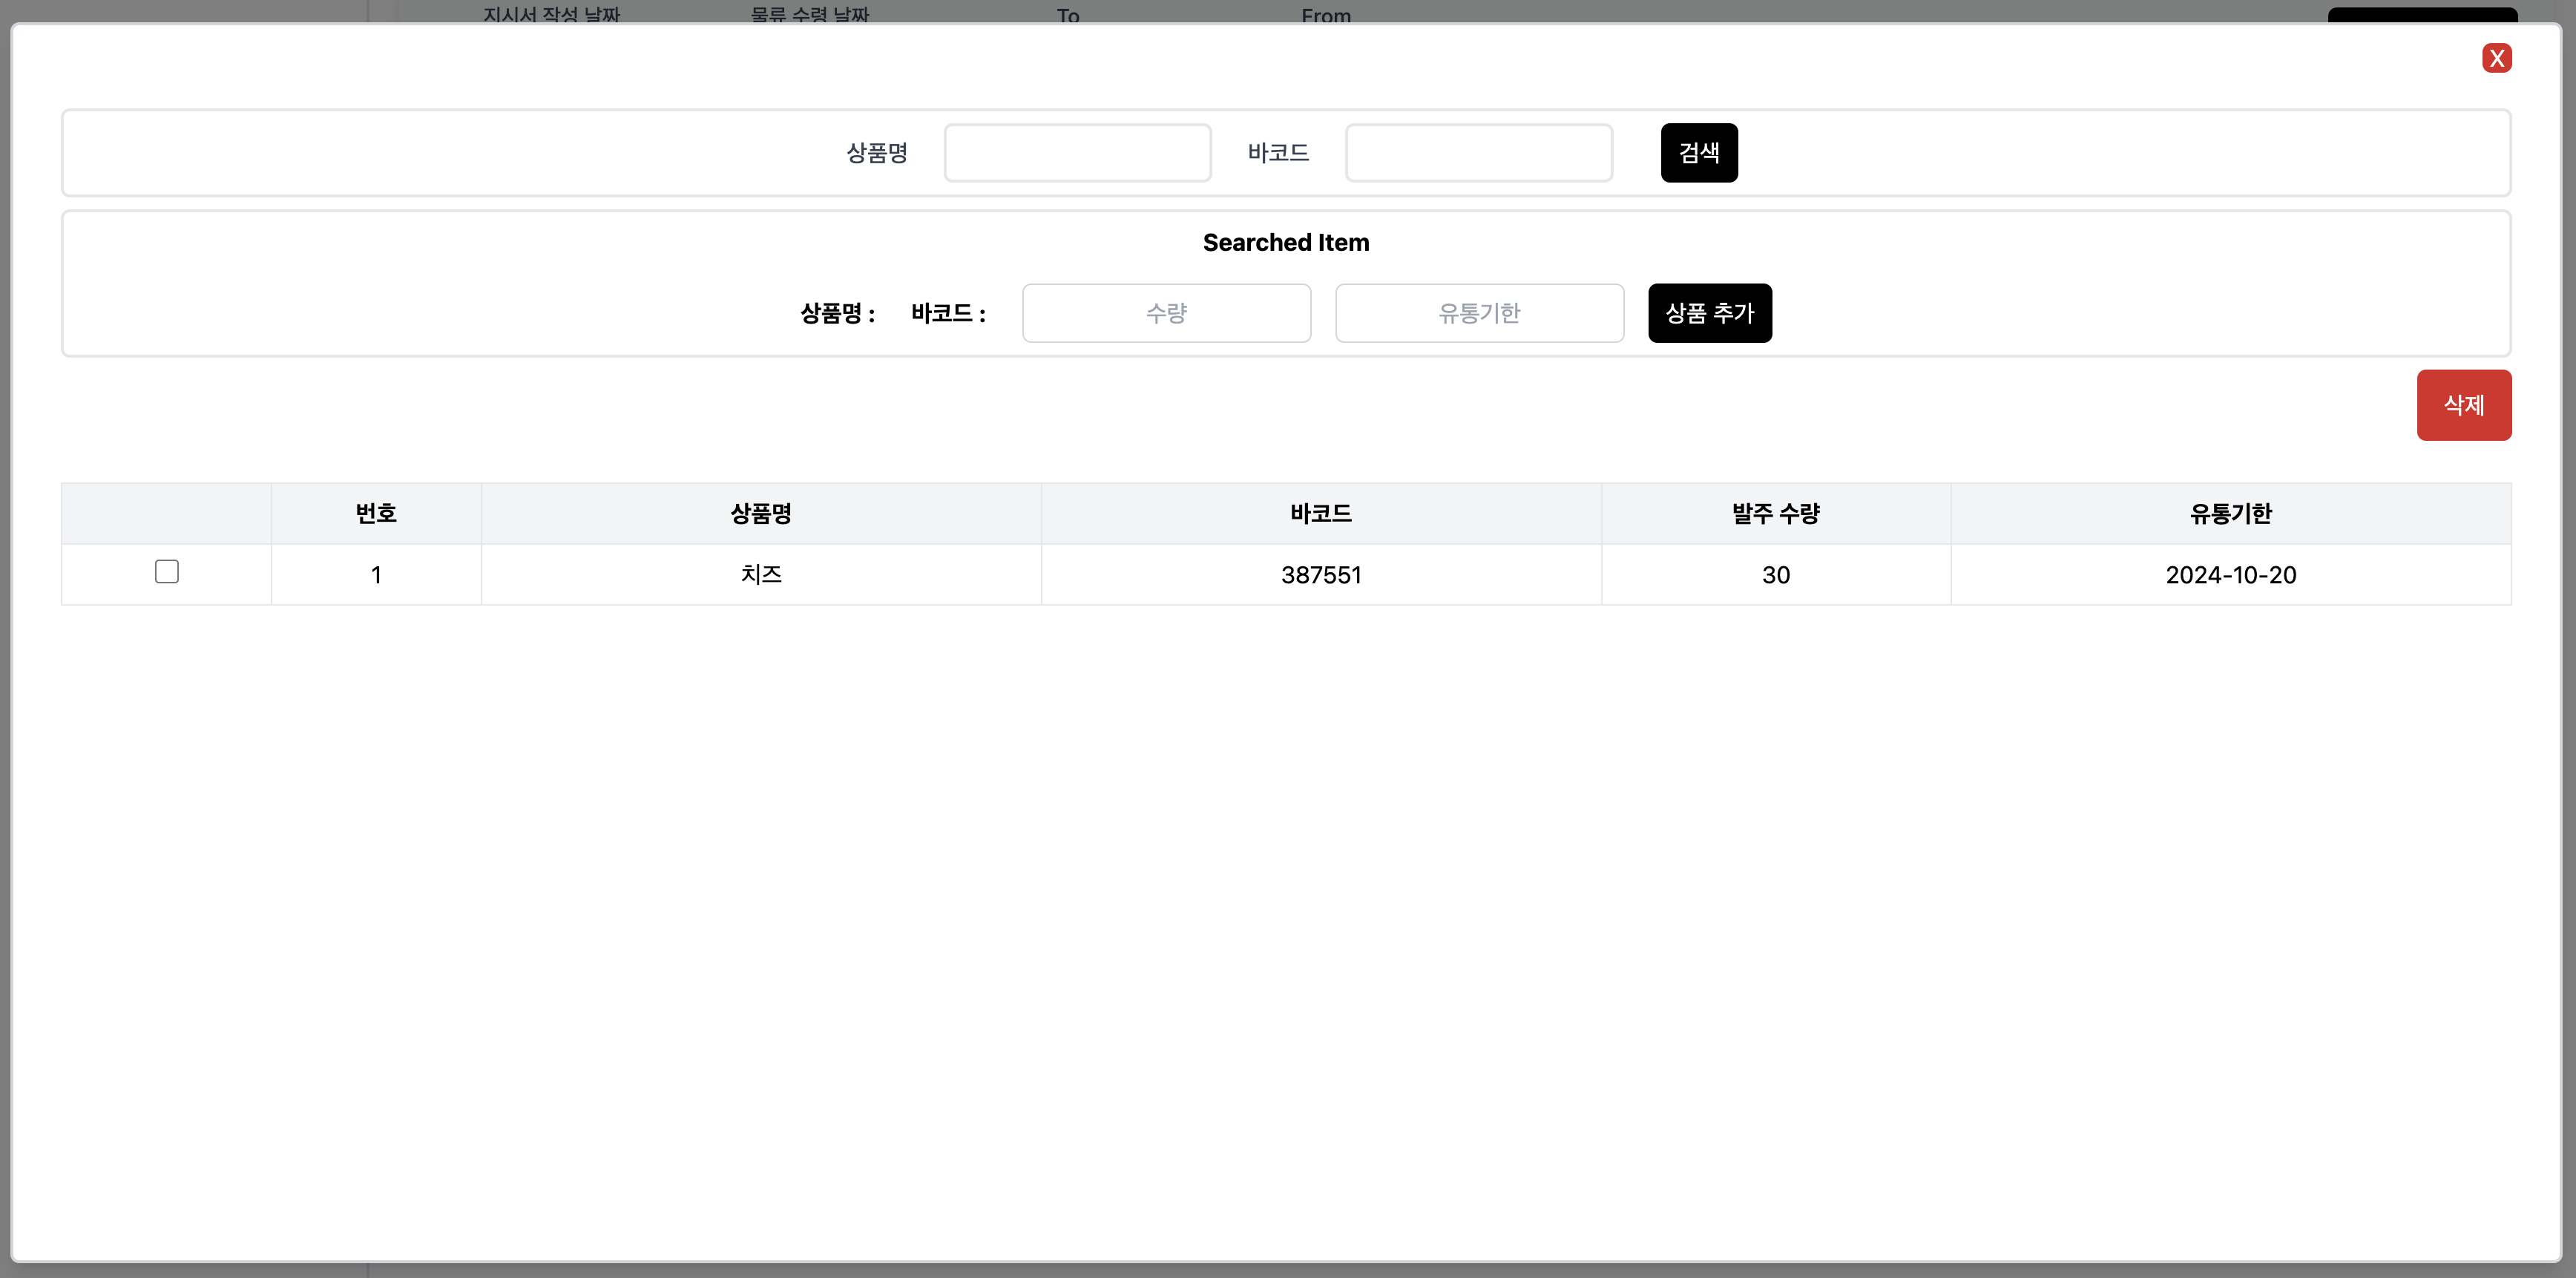

위 사진에서는 지시서 생성 페이지에서 등록하고자하는 아이템의 기본정보를 입력하여 검색 & 추가 정보를 입력하여 지시서에 상품을 추가하는 과정을 보여준다.
페이지를 이탈하면 새로운 지시서가 Order Page 리스트에 추가된다.
다음으로는 상세보기 페이지에서 생성한 지시서의 내용을 확인 & 수정하는 과정을 보여주고자 한다.
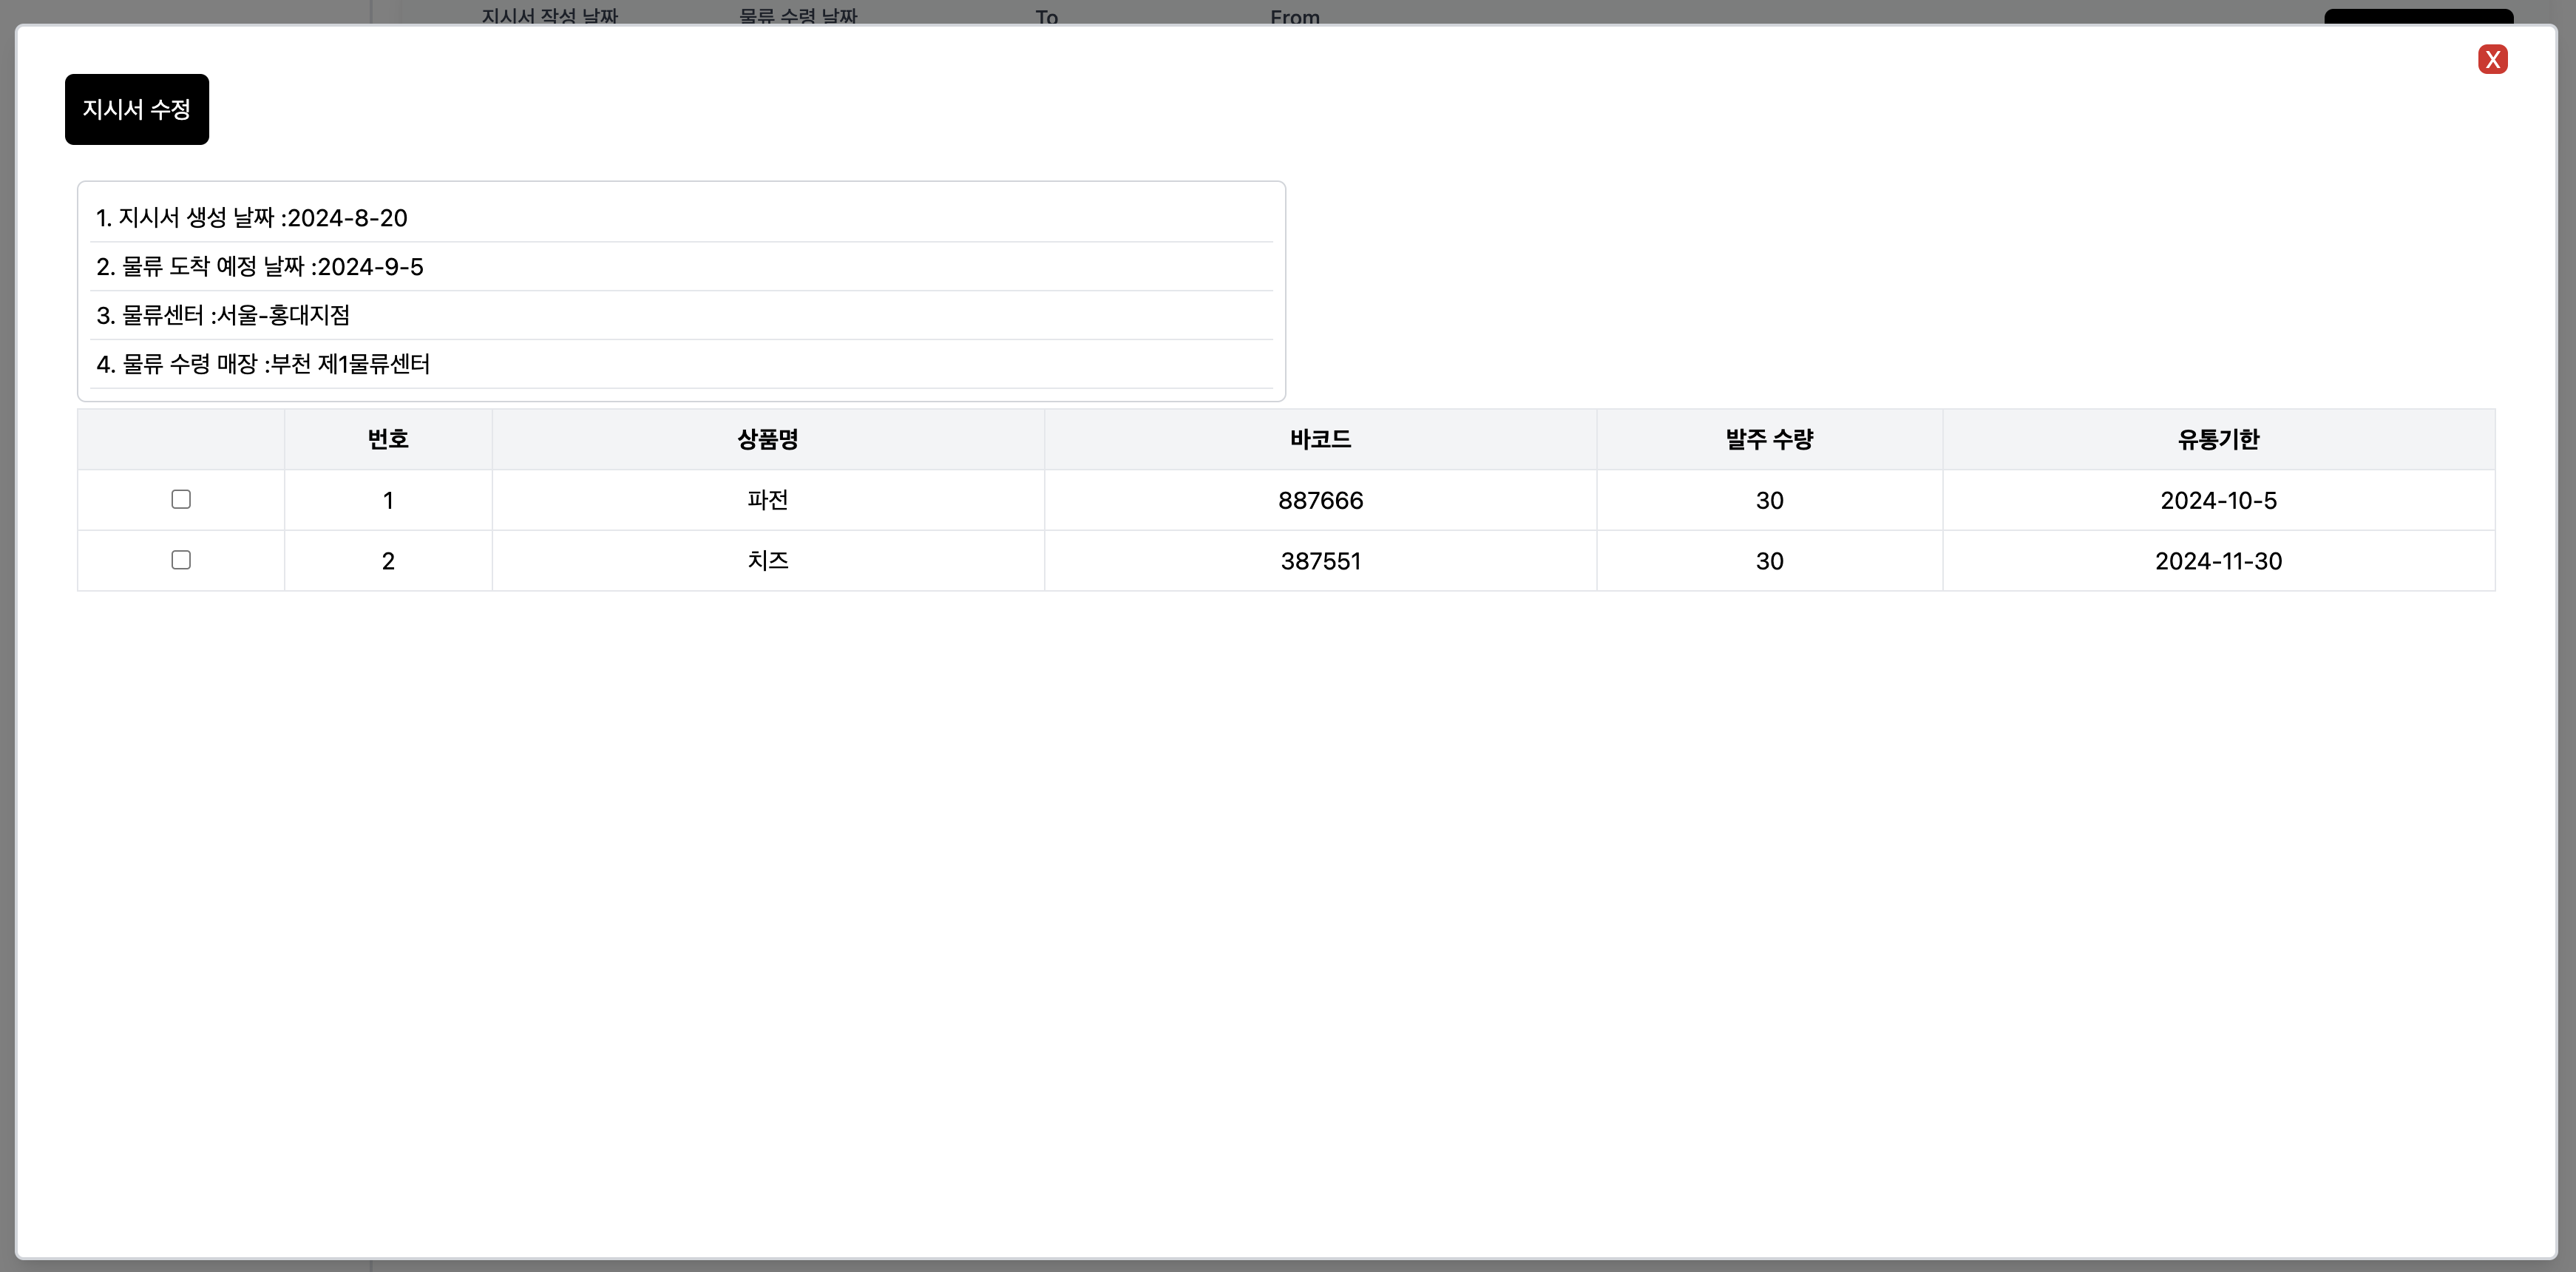

위 사진에서는 Order Page에서 지시서의 상세보기 버튼을 클릭하여 지시서 수정이 가능한 페이지로 이동하는 과정을 보여준다.
1-5. Order Process 페이지
다음으로는 Order Process 페이지의 화면 구성이다.

1. 상품의 바코드를 입력한다.
2. 지시서의 물류 수령날짜가 오늘인 상품들 중에서 해당 바코드에 맞는 상품을 가져와서 기본 정보를 화면에 띄운다.
3. 만약 동일한 상품이더라도 유통기한의 정보가 다르면 사용자가 대상을 선택할 수 있도록 추가적인 화면을 제공한다.
4. 화면의 Form에 맞춰서 데이터를 입력하고 저장 버튼을 누르면 itemList에 추가된다.
5. 초기화 버튼을 누르면 입력 정보가 모두 초기화된다.

1-6. Order Status 페이지
다음으로는 Order Status 페이지의 화면 구성이다.
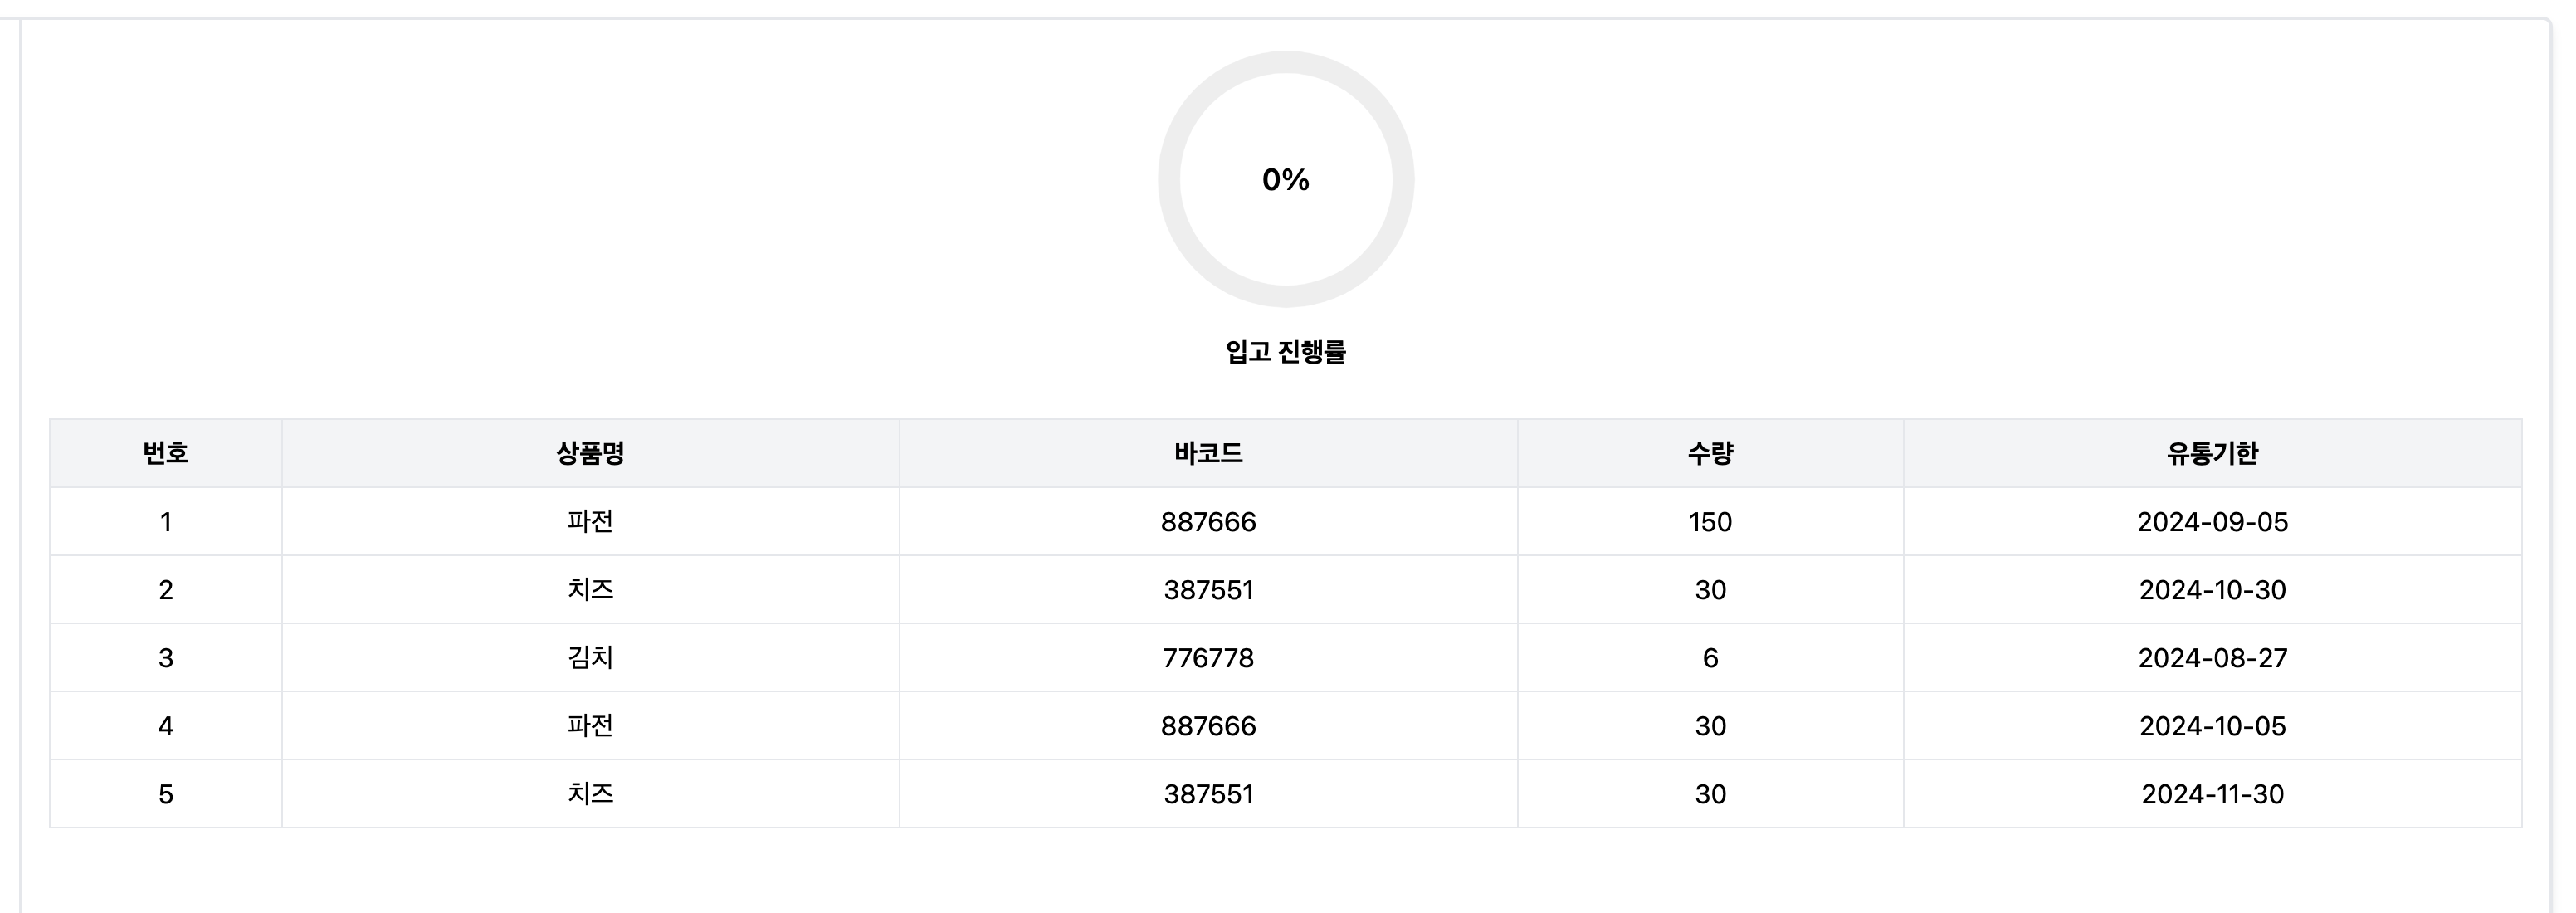
주요 기능은 아래와 같다.
1. 금일 수령 예정인 상품들의 리스트를 하단에 보여준다.
2. 금일 수령 예정인 상품들을 itemList에 얼마나 등록했는지 퍼센트로 입고 진행률을 화면에 보여준다.
OrderStatus를 변화시키기 위해 OrderProcess를 진행해보고 그 과정을 살펴보자.


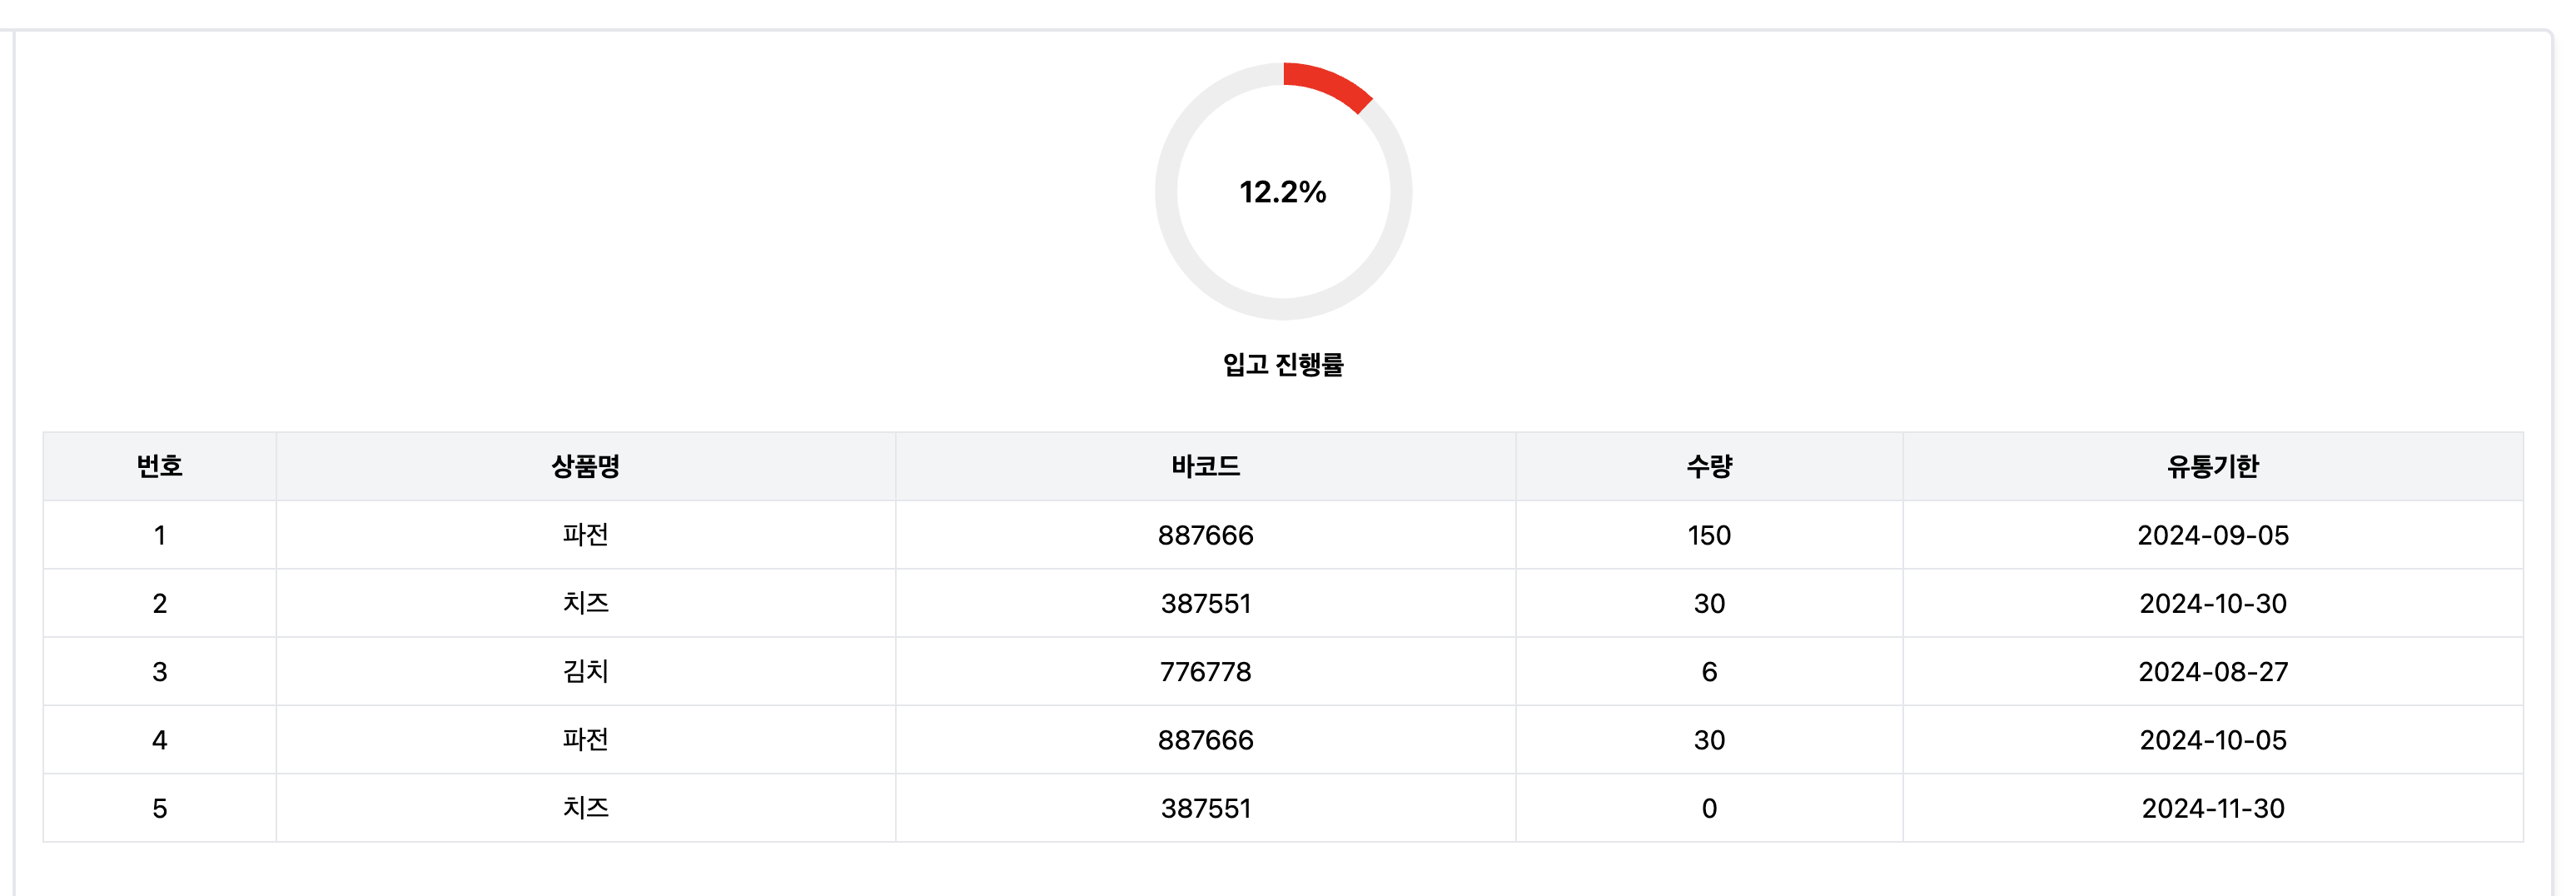
OrderStatus에서 등록 가능한 상품중 하나를 OrderProcess 페이지에서 등록한다.
이후, itemList에 정상적으로 등록되었는지 확인하기 위해 Update 페이지를 살펴본다.
다시 OrderStatus 페이지에 돌아오면 진행률이 변화함을 확인할 수 있다.
지금까지 IMS with TS (version2)의 기능을 간략하게 살펴봤다.
이제부터는 구현 과정에서 어떤 문제를 겪었는지 살펴보자.
2. 삽질
우선 코드의 번잡함을 줄이려고 가장 많은 노력을 했다.
자세히 살펴보기 이전에 간단하게 컴포넌트 트리를 살펴보자.

설계상으로 itemList는 모든 컴포넌트에서 필요에 따라 접근할 수 있어야한다.
또한, Order 페이지에서 생성하는 orderDirection 데이터도 마찬가지로 최상위에서 관리되어야 한다.
이 부분을 유의하고 포스팅을 계속 진행해보자.
2-1. 설계의 문제 - useReducer를 어떻게 세팅할까?
코드의 복잡도를 줄이기 위해서 이전 버전의 App.tsx에서 정의된 로직들을 다른 파일에서 관리하고자 하였다.
코드를 한번 살펴보자.
import { Routes } from "react-router";
import { routeNav } from "./Util/Navigate";
import { useReducer } from "react";
import { itemDispatch } from "./Util/ItemDispatch";

function App() {
  const [itemList, dispatchItemList] = useReducer(itemDispatch, []);

  return (
    <div className="App">
      <Routes>{routeNav()}</Routes>
    </div>
  );
}

export default App;
import { Item } from "../types";
import {
  AddItemListProps,
  DeleteItemListProps,
  UpdateItemListProps,
} from "../types";
import { validateUsingBoolean } from "./Validate";

type ItemListAction =
  | {
      type: "CREATE",
      data: AddItemListProps,
    }
  | {
      type: "UPDATE",
      data: UpdateItemListProps,
    }
  | {
      type: "DELETE",
      data: DeleteItemListProps,
    };

export const findIndex = (list: Item[], targetId: string) => {
  return list.findIndex((item) => item.id === targetId);
};

export const itemDispatch = (state: Item[], action: ItemListAction) => {
  switch (action.type) {
    case "CREATE": {
      const index = findIndex(state, action.data.id);
      if (index === -1) {
        return [...state, action.data];
      } else {
        state[index].quantity += Number(action.data.quantity);
        return [...state];
      }
    }
    case "UPDATE": {
      const index = findIndex(state, action.data.id);
      validateUsingBoolean(index === -1);

      const newId = `${state[index].barcode}-${action.data.updateLocation}-${state[index].expDate}`;
      if (state[index].quantity === action.data.updateQuantity) {
        state.splice(index, 1);
        return [
          ...state,
          {
            ...state[index],
            id: newId,
            location: action.data.updateLocation,
            quantity: action.data.updateQuantity,
          },
        ];
      } else {
        state[index].quantity -= Number(action.data.updateQuantity);
        return [
          ...state,
          {
            ...state[index],
            id: newId,
            location: action.data.updateLocation,
            quantity: action.data.updateQuantity,
          },
        ];
      }
    }
    case "DELETE": {
      const index = findIndex(state, action.data.id);
      validateUsingBoolean(index === -1);
      state.splice(index, 1);
      return [...state];
    }
  }
};
코드를 간단하게 설명하자면 최상위 컴포넌트인 App에서 itemList를 관리하는 상태 변수가 선언되어있다.
이는 useReducer로 관리되기 때문에 생성하는 시점에 itemDispatch 콜백 함수를 전달해줘야한다.
하지만, itemDispatch의 코드가 너무 길기때문에 다른 파일에서 관리하고 싶었다. 그래서 위처럼 우선 코드를 분리했다.
다시 돌아와서 itemList를 살펴보자. App.tsx에 선언된 itemList의 상태를 변화시키는 것은 dispatchItemList이다.
(왜냐하면 const [itemList, dispatchItemList] = useReducer(itemDispatch, []) 이므로)
위 코드 기준으로 itemDispatch는 ItemListAction 타입을 갖는 action을 매개변수로 전달받아서 동작한다.
action은 이전 버전의 IMS에서 작성한 코드에서 가져왔다. 코드는 아래의 사진과 같다.
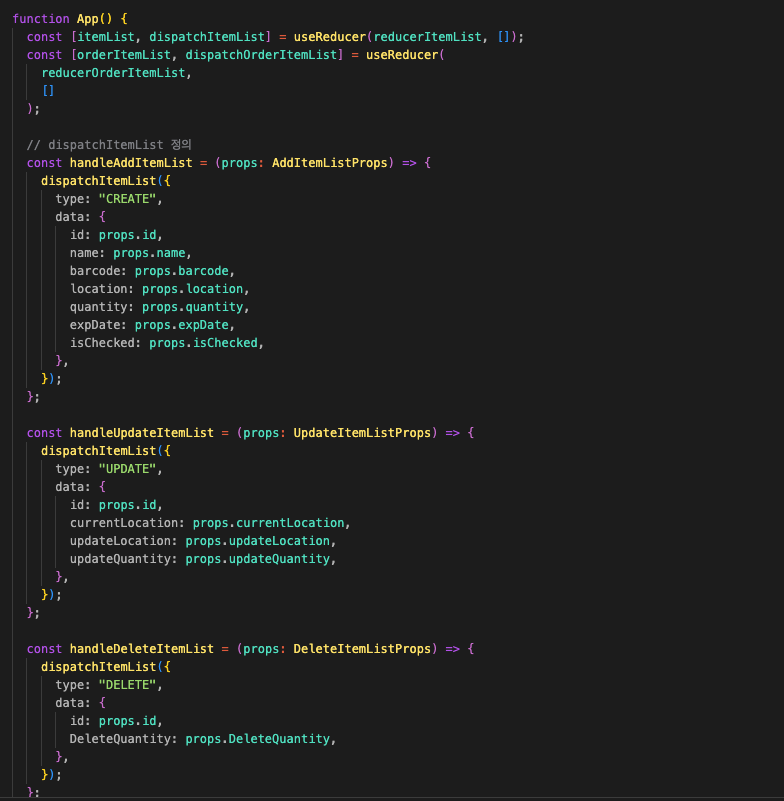
나는 dispatchItemList에서 type과 action을 전달해주는 부분을 모두 커스텀 훅으로 만들어서 제공하고자 하였다.
아마도 작성하면 위 사진에서 정의된 hadleAddItemList는 아래와같이 사용할 수 있을거라고 생각했다.
const handleAddItemList = useCusHook({"CREATE", AddItemListProps, dispatchItemList});
하지만, 바로 문제가 있음을 깨달았다. useCusHook의 매개변수로 전달되는 AddItemListProps는 Add 페이지에서 정의될 것이다.
dispatchItemList를 매개변수로 전달하기 위해서는 App.tsx에서 전달받아야한다. 즉, 매개변수를 정상적으로 전달받을 수 없는 설계인 것이다.
그렇다면 이 문제를 어떻게 해결할 수 있을까? 답은 간단하다.
App.tsx에서 useReducer로 정의된 [itemList, dispatchItemList]에서 dispatchItemList를 다른 파일에서도 사용할 수 있으면 된다.
이 부분을 어떻게 해결해야할까 찾아보다가 Recoil을 알게되었다.
2-2. Recoil과 만남
Recoil을 사용한 이유는 전역으로 상태 관리를 도와주는 라이브러리라는 점이다.
이 부분을 이용하면 이전 버전에서 사용한 Context API를 사용하지 않고도 대상의 상태를 변화시킬 수 있다.
찾아보니 사용 방법은 아래와 같았다.
1. 관리하고자 하는 상태 변수를 atom으로 선언한다.
2. selector를 이용하여 해당 상태를 변화시키기 위한 로직을 구현한다.
3. 최상위 컴포넌트에서 <RecoilRoot> 태그를 이용하여 하위 컴포넌트들을 wrapping한다.
4. 필요한 경우 useReocilValue, useSetRecoilState 등의 훅을 이용하여 사용한다.
여기서부터 엄청난 삽질이 시작된다…
가장 큰 문제는 처음 사용해봐서 미숙했다는 것이고 사용 방법을 정확히 모르고 머리부터 들이밀었으니 당연히 문제가 발생했다.
나의 생각 시퀀스는 아래와 같다.
목표 : useReducer에서 dispatch를 설정해주는 것처럼 매개변수로 동작의 타입과 데이터를 넘겨서 로직을 처리하고 싶다!
      (다른 곳에서 내부적으로 동작을 알아서 처리하면 좋겠다!)

-> 찾아보니 selector는 set함수를 호출할 때 매개변수를 받지 못한다.
-> selectorFamily는 매개변수를 전달받아서 set함수를 호출할 수 있더라.
-> selectorFamily로 코드를 작성해보자!
->
export const itemListSelectorFamily = selectorFamily({
  key: "itemListSelectorFamily",
  set:
    ({ type, data }: ItemListAction) =>
    ({ get, set }, newItemListState: Item[]) => {
      const itemList = get(itemListState);
      switch (type) {
        case "CREATE": {
          const index = findIndex(itemList, data.id);
          if (index === -1) {
            newItemListState = [...itemList, data];
          } else {
            newItemListState[index].quantity += Number(data.quantity);
          }
          break;
        }
        case "UPDATE": {
          const index = findIndex(itemList, data.id);
          validateUsingBoolean(index === -1);

          const newId = `${itemList[index].barcode}-${data.updateLocation}-${itemList[index].expDate}`;
          if (itemList[index].quantity === data.updateQuantity) {
            newItemListState = itemList.splice(index, 1);
            newItemListState = [
              ...itemList,
              {
                ...itemList[index],
                id: newId,
                location: data.updateLocation,
                quantity: data.updateQuantity,
              },
            ];
          } else {
            itemList[index].quantity -= Number(data.updateQuantity);
            newItemListState = [
              ...itemList,
              {
                ...itemList[index],
                id: newId,
                location: data.updateLocation,
                quantity: data.updateQuantity,
              },
            ];
          }
          break;
        }
        case "DELETE": {
          const index = findIndex(itemList, data.id);
          validateUsingBoolean(index === -1);
          newItemListState = itemList.splice(index, 1);
          break;
        }
      }
      set(itemListState, newItemListState);
    },
});
-> 오류 발생 / 내용은 아래와 같다.

No overload matches this call.
  Overload 1 of 2, '(options: ReadWriteSelectorFamilyOptions<unknown, SerializableParam>): (param: SerializableParam) => RecoilState<...>', gave the following error.
    Type '({ type, data }: ItemListAction) => ({ get, set }: { set: SetRecoilState; get: GetRecoilValue; reset: ResetRecoilState; }, newItemListState: Item[]) => void' is not assignable to type '(param: SerializableParam) => (opts: { set: SetRecoilState; get: GetRecoilValue; reset: ResetRecoilState; }, newValue: unknown) => void'.
      Types of parameters '__0' and 'param' are incompatible.
        Type 'SerializableParam' is not assignable to type 'ItemListAction'.
          Type 'undefined' is not assignable to type 'ItemListAction'.
  Overload 2 of 2, '(options: ReadOnlySelectorFamilyOptions<unknown, SerializableParam>): (param: SerializableParam) => RecoilValueReadOnly<unknown>', gave the following error.
    Object literal may only specify known properties, and 'set' does not exist in type 'ReadOnlySelectorFamilyOptions<unknown, SerializableParam>'.

-> 간단히 요약하면 '전달받은 매개변수 {type, data}가 SerializableParam과 동일하지 않다.'는 것이다.
-> selectorFamily의 매개변수 타입과 반환 타입을 살펴보자
->
function selectorFamily<T, P: Parameter>({
  key: string,

  get: P => ({
    get: GetRecoilValue
    getCallback: GetCallback<T>,
  }) =>
    T | Promise<T> | Loadable<T> | WrappedValue<T> | RecoilValue<T>,

  set: P => (
    {
      get: GetRecoilValue,
      set: SetRecoilValue,
      reset: ResetRecoilValue,
    },
    newValue: T | DefaultValue,
  ) => void,

  dangerouslyAllowMutability?: boolean,

  cachePolicy_UNSTABLE?: CachePolicy,
}): P => RecoilState<T>

-> 우선 selectorFamily의 반환 타입과 파라미터 타입 정의에 맞춰서 selectorFamily를 호출해보자.
->
export const itemListSelectorFamily = selectorFamily<Item[], ItemListAction>({
  key: "itemListSelectorFamily",
  set:
    ({ type, data }: ItemListAction) =>
    ({ get, set }, newItemListState: Item[]) => {
        ...
-> 다음으로 아래와 같은 오류가 발생한다.

Type 'ItemListAction' does not satisfy the constraint 'SerializableParam'.
  Type '{ type: "CREATE"; data: AddItemListProps; }' is not assignable to type 'SerializableParam'.
    Type '{ type: "CREATE"; data: AddItemListProps; }' is not assignable to type 'Readonly<{ [key: string]: SerializableParam; }>'.
      Property 'data' is incompatible with index signature.
        Type 'AddItemListProps' is not assignable to type 'SerializableParam'.
          Type 'AddItemListProps' is not assignable to type 'Readonly<{ [key: string]: SerializableParam; }>'.
            Index signature for type 'string' is missing in type 'AddItemListProps'.ts(2344)

-> 매개변수로 받는 파라미터의 타입이 SerializableParam이 아니기 때문에 발생하는 문제이다.
-> 그렇다면 P의 타입이 어떻게 정의되어있길래 에러가 발생하는 걸까?
->
export function selectorFamily<T, P extends SerializableParam>(
options: ReadWriteSelectorFamilyOptions<T, P>,
): (param: P) => RecoilState<T>;

-> P는 SerializableParam을 extends하고 있음을 확인할 수 있다.
->
interface HasToJSON { toJSON(): SerializableParam; }

 export type SerializableParam =
  | Primitive
  | HasToJSON
  | ReadonlyArray<SerializableParam>
  | ReadonlySet<SerializableParam>
  | ReadonlyMap<SerializableParam, SerializableParam>
  | Readonly<{[key: string]: SerializableParam}>;

-> SerializableParam의 타입을 살펴보니 Primitive인 기본타입과 Readonly 타입만을 허용하고 있음을 확인할 수 있었다.
-> 그래서 파라미터의 value타입을 모두 primitive 혹은 readonly 타입으로 변경해봤다.

type ItemListAction =
  | {
      type: "CREATE";
      data: Readonly<AddItemListProps>;
    }
  | {
      type: "UPDATE";
      data: Readonly<UpdateItemListProps>;
    }
  | {
      type: "DELETE";
      data: Readonly<DeleteItemListProps>;
    };

-> 그랬더니 우선 파라미터에서 발생하는 오류는 사라졌다.
-> 이후에도 몇번의 수정 (파라미터의 타입은 DefaultValue를 취급해야한다.. 타입 좁히기를 통해 Item[]일때만 switch문을 시행…, get이 정의되어야만 한다….)을 거쳐서 결국 아래와 같은 코드를 작성하게 되었다.
-> 여기서부터 코드가 맘에 들지 않았다.

import { DefaultValue, selector, selectorFamily } from "recoil";
import { Item } from "../types";
import {
  AddItemListProps,
  DeleteItemListProps,
  UpdateItemListProps,
} from "../types";
import { validateUsingBoolean } from "../Util/Validate";
import { itemListState } from "../Atom/atoms";

type ItemListAction =
  | {
      type: "CREATE";
      data: Readonly<AddItemListProps>;
    }
  | {
      type: "UPDATE";
      data: Readonly<UpdateItemListProps>;
    }
  | {
      type: "DELETE";
      data: Readonly<DeleteItemListProps>;
    };

export const findIndex = (list: Item[], targetId: string) => {
  return list.findIndex((item) => item.id === targetId);
};

export const itemListSelector = selector({
  key: "itemListSelector",
  get: ({ get }) => {
    return get(itemListState);
  },
});

export const itemListSelectorFamily = selectorFamily<Item[], ItemListAction>({
  key: "itemListSelectorFamily",
  get:
    () =>
    ({ get }) => {
      return get(itemListState);
    },
  set:
    ({ type, data }: ItemListAction) =>
    ({ get, set }, newValue: Item[] | DefaultValue) => {
      const itemList = get(itemListState);

      if (!(newValue instanceof DefaultValue) && Array.isArray(newValue)) {
        switch (type) {
          case "CREATE": {
            const index = findIndex(itemList, data.id);
            if (index === -1) {
              newValue = [...itemList, data];
            } else {
              newValue[index].quantity += Number(data.quantity);
            }
            break;
          }
          case "UPDATE": {
            const index = findIndex(itemList, data.id);
            validateUsingBoolean(index === -1);

            const newId = `${itemList[index].barcode}-${data.updateLocation}-${itemList[index].expDate}`;
            if (itemList[index].quantity === data.updateQuantity) {
              newValue = itemList.splice(index, 1);
              newValue = [
                ...itemList,
                {
                  ...itemList[index],
                  id: newId,
                  location: data.updateLocation,
                  quantity: data.updateQuantity,
                },
              ];
            } else {
              itemList[index].quantity -= Number(data.updateQuantity);
              newValue = [
                ...itemList,
                {
                  ...itemList[index],
                  id: newId,
                  location: data.updateLocation,
                  quantity: data.updateQuantity,
                },
              ];
            }
            break;
          }
          case "DELETE": {
            const index = findIndex(itemList, data.id);
            validateUsingBoolean(index === -1);
            newValue = itemList.splice(index, 1);
            break;
          }
        }
        set(itemListState, newValue as Item[]);
      }
    },
});
-> 개발을 꾸준히 진행한 이후, Add 페이지에서 위 selectorFamily를 이용하여 itemList를 수정하려고 했을 때였다.
-> Add 페이지에서 addItemList.map(item => ~~~)를 이용하여 addItemList를 순회하며 데이터를 추가할 생각이었으나 useRecoilValue는 훅이므로 함수 내부에서 호출할 수 없었다.
***** 여기서 useRecoilValue를 일반적인 set함수로 생각하는 문제가 있었다. *****
***** 지금보면 useRecoilState를 이용해서 set함수를 호출받아서 로직을 처리했으면 됐으나 정확한 이해없이 사용하려고 하니 문제가 발생했던 것이다. *****
-> 그래서 selector의 매개변수로 단일 변수를 받는 것이 아니라 addItemList 자체를 매개변수로 전달하여 로직을 수행하도록 코드를 수정한다.
->
(ItemListAction은 P의 타입을 지정하는 부분이다.)
type ItemListAction =
  | {
      type: "CREATE";
      data: Readonly<AddItemListProps[]>;
    }
  | {
      type: "UPDATE";
      data: Readonly<UpdateItemListProps[]>;
    }
  | {
      type: "DELETE";
      data: Readonly<DeleteItemListProps[]>;
    };
-> 그랬더니 배열의 타입과 관련된 오류가 계속 발생한다.
-> Param에서는 Primitive 타입은 허용되기 때문에 data를 flatten시키기로 했다.
-> P 타입 정의 (매개변수 데이터 flatten 작업)

type CreateAction = {
  type: "CREATE";
  data: {
    id: string;
    name: string;
    barcode: number;
    location: string;
    quantity: number;
    expDate: string;
    isChecked: boolean;
  }[];
};

type UpdateAction = {
  type: "UPDATE";
  data: {
    id: string;
    currentLocation: string;
    updateLocation: string;
    updateQuantity: number;
  }[];
};

type DeleteAction = {
  type: "DELETE";
  data: {
    id: string;
    DeleteQuantity: number | string;
  }[];
};

type ItemListAction = CreateAction | UpdateAction | DeleteAction;
-> 이후 selectorFamily 내부에서 배열을 순회하며 atom의 상태를 변화시키도록 로직을 구현했다.
-> 이제 사용해보자!
->
const setItemList = useSetRecoilState(
    itemListSelectorFamily({ type: "CREATE", data: addItemList })
  );

  const onClickSaveButton = () => {
    setItemList();
  };
-> 당연히 위처럼 사용할 수 없다. 매개변수로 넘겨주는 부분은 초기값을 설정하는 부분이다. (지금 생각해보면 참 대담했던 것 같다.)
-> 생각해보니 훅이 어떻게 구현되어있는지, 어떻게 사용하는지도 모르면서 내 마음대로 사용하려고 했었다.
-> 이때부터 오기가 생겨서 Recoil의 훅을 뜯어보기로 했다.
-> [https://github.com/facebookexperimental/Recoil/blob/main/packages/recoil/hooks/Recoil_Hooks.js]
2-3. Recoil 훅 살펴보기 (useRecoilValue, useRecoilState)
Recoil의 모든 훅을 살펴보려는 것은 아니다. 이번 개발에서 주로 사용했던 useRecoilValue는 어떤식으로 동작하는지를 살펴보고자 한다.
Recoil 깃허브에 들어가보자.
(useRecoilValue는 packages -> recoil -> hooks -> Recoil_Hooks.js에 정의되어있는 것을 확인할 수 있다.)
useRecoilValue는 useRecoilInterface_DEPRECATED():RecoilInterface라는 function의 리턴으로 정의되어있는 함수이다. 첫번째로 리턴타입인 RecoilInterface를 살펴보자.
export type RecoilInterface = {
  getRecoilValue: <T>(RecoilValue<T>) => T,
  getRecoilValueLoadable: <T>(RecoilValue<T>) => Loadable<T>,
  getRecoilState: <T>(RecoilState<T>) => [T, SetterOrUpdater<T>],
  getRecoilStateLoadable: <T>(
    RecoilState<T>
  ) => [Loadable<T>, SetterOrUpdater<T>],
  getSetRecoilState: <T>(RecoilState<T>) => SetterOrUpdater<T>,
  getResetRecoilState: <T>(RecoilState<T>) => Resetter,
};
useRecoilInterface_DEPRECATED() 함수는 위에서 정의된 여러 함수들을 리턴한다는 것을 파악할 수 있다.
그렇다면 어떻게 리턴하고 있을까?
...
return useMemo(() => {
    function useSetRecoilState<T>(
      recoilState: RecoilState<T>,
    ): SetterOrUpdater<T> {
      if (__DEV__) {
        validateRecoilValue(recoilState, 'useSetRecoilState');
      }
      return (
        newValueOrUpdater: (T => T | DefaultValue) | T | DefaultValue,
      ) => {
        setRecoilValue(storeRef.current, recoilState, newValueOrUpdater);
      };
    }

    function useResetRecoilState<T>(recoilState: RecoilState<T>): Resetter {
      if (__DEV__) {
        validateRecoilValue(recoilState, 'useResetRecoilState');
      }
      return () => setRecoilValue(storeRef.current, recoilState, DEFAULT_VALUE);
    }

    //...
     return {
      getRecoilValue: useRecoilValue,
      getRecoilValueLoadable: useRecoilValueLoadable,
      getRecoilState: useRecoilState,
      getRecoilStateLoadable: useRecoilStateLoadable,
      getSetRecoilState: useSetRecoilState,
      getResetRecoilState: useResetRecoilState,
    };

}, [recoilValuesUsed, storeRef]);
}
함수의 리턴 부분만 가져와봤다. 위 코드를 간단하게 분석해보면 아래와 같다.
1. useMemo를 사용해서 return할 함수를 정의한다.
2. 마지막으로 반환 타입에 맞춰서 이전에 생성한 함수들을 이용하여 객체를 생성 & 반환한다.
(이렇게 함수를 반환하는 아이디어도 얻게되었다.)
그렇다면 useRecoilValue는 어떻게 구현되었는가?
function useRecoilValue<T>(recoilValue: RecoilValue<T>): T {
  if (__DEV__) {
    validateRecoilValue(recoilValue, "useRecoilValue");
  }
  const loadable = useRecoilValueLoadable(recoilValue);
  return handleLoadable(loadable, recoilValue, storeRef);
}
파라미터로 RecoilValue 타입의 recoilValue를 전달받는다.
다음으로 JS의 __DEV__ 변수를 이용해서 개발 환경인지 먼저 판별한다.
만약 개발환경이 맞다면 “validateRecoilValue” 함수를 호출한다.
validateRecoilValue는 뭘 의미할까? 무슨 목적으로 개발 환경인지를 판별하는걸까?
const { isRecoilValue } = require("../core/Recoil_RecoilValue");

function validateRecoilValue<T>(
  recoilValue: RecoilValue<T>,
  hookName:
    | $TEMPORARY$string<"useRecoilState">
    | $TEMPORARY$string<"useRecoilStateLoadable">
    | $TEMPORARY$string<"useRecoilState_TRANSITION_SUPPORT_UNSTABLE">
    | $TEMPORARY$string<"useRecoilValue">
    | $TEMPORARY$string<"useRecoilValueLoadable">
    | $TEMPORARY$string<"useRecoilValueLoadable_TRANSITION_SUPPORT_UNSTABLE">
    | $TEMPORARY$string<"useRecoilValue_TRANSITION_SUPPORT_UNSTABLE">
    | $TEMPORARY$string<"useResetRecoilState">
    | $TEMPORARY$string<"useSetRecoilState">
) {
  if (!isRecoilValue(recoilValue)) {
    throw err(
      `Invalid argument to ${hookName}: expected an atom or selector but got ${String(
        recoilValue
      )}`
    );
  }
}
import type { NodeKey } from "./Recoil_State";

// eslint-disable-next-line no-unused-vars
class AbstractRecoilValue<+T> {
  key: NodeKey;
  constructor(newKey: NodeKey) {
    this.key = newKey;
  }
  toJSON(): { key: string } {
    return { key: this.key };
  }
}

class RecoilState<T> extends AbstractRecoilValue<T> {}

class RecoilValueReadOnly<+T> extends AbstractRecoilValue<T> {}

export type RecoilValue<T> = RecoilValueReadOnly<T> | RecoilState<T>;

function isRecoilValue(x: mixed): boolean %checks {
  return x instanceof RecoilState || x instanceof RecoilValueReadOnly;
}
즉, isRecoilValue함수를 이용해서 파라미터로 전달받은 RecoilValue가 RecoilState 혹은 RecoilValueReadOnly의 인스턴스인지 확인하고 있다.
찾아보니 이러한 개발 방식은 훅이 호출되는 시점에 오류를 조기 발견하기 위해 사용되는 방식이라고 한다.
이후, 상세 오류 메세지를 던져주면서 라이브러리의 견고성을 높여준다.
이어서 살펴보자.
const loadable = useRecoilValueLoadable(recoilValue);
useRecoilValueLoadable 훅이 recoilValue를 이용해서 뭔가를 하고 있다.
useRecoilValueLoadable는 무슨 역할을 할까?
const storeRef = useStoreRef();

function useRecoilValueLoadable<T>(recoilValue: RecoilValue<T>): Loadable<T> {
  if (__DEV__) {
    validateRecoilValue(recoilValue, "useRecoilValueLoadable");
  }
  if (!recoilValuesUsed.current.has(recoilValue.key)) {
    recoilValuesUsed.current = setByAddingToSet(
      recoilValuesUsed.current,
      recoilValue.key
    );
  }
  // TODO Restore optimization to memoize lookup
  const storeState = storeRef.current.getState();
  return getRecoilValueAsLoadable(
    storeRef.current,
    recoilValue,
    reactMode().early
      ? storeState.nextTree ?? storeState.currentTree
      : storeState.currentTree
  );
}
useRecoilValueloadable 함수는 다른 곳에서 정의된 여러가지 기능을 복합적으로 사용하여 정의되고 있다.
따라서, useRecoilValueLoadable을 이해하기 위해서는 아래 함수 & 변수들이 어떤 역할을 하는지 먼저 확인해야한다.
확인 필요 목록
1. validateRecoilValue <- 위에서 이미 확인했다.
2. useStoreRef()
3. setByAddingToSet()
3. recoilValuesUsed
4. getRecoilValueAsLoadable
//2. useStoreRef

// The Store is just the interface that is made available via the context.
// It is constant within a given Recoil root.
export type Store = $ReadOnly<{
  storeID: StoreID,
  parentStoreID?: StoreID,
  getState: () => StoreState,
  replaceState: ((TreeState) => TreeState) => void,
  getGraph: (StateID) => Graph,
  subscribeToTransactions: (
    (Store) => void,
    ?NodeKey
  ) => { release: () => void },
  addTransactionMetadata: ({ ... }) => void,
  skipCircularDependencyDetection_DANGEROUS?: boolean,
}>;

export type StoreRef = {
  current: Store,
};

const AppContext = React.createContext < StoreRef > { current: defaultStore };
const useStoreRef = (): StoreRef => useContext(AppContext);
useStoreRef는 store타입의 current 프로퍼티를 갖는 AppContext를 contextAPI를 이용하여 호출하는 훅이다.
즉, 정리하면 useRef와 같이 current에 값을 저장할 수 있으며 그 타입으로는 store를 갖는 훅이다.
그러면 store는 무슨 역할을 하는가? 이 부분을 알아보기 위해 useRecoilValueLoadable에서 useStoreRef를 어떻게 사용하는지 살펴봤다.
“const storeState = storeRef.current.getState();”와 같이 state를 불러와서 nextTree, currentTree값을 사용하는 것이 목표인 것 같다.
그래서 Store의 프로퍼티인 getState가 리턴하는 StoreState타입이 어떻게 정의되었는지 살펴보고자 한다.
export type StoreState = {
  currentTree: TreeState,
  nextTree: null | TreeState,
  previousTree: null | TreeState,
  ...
};
StoreState타입에는 다른 프로퍼티들도 많다.
여기서는 주석이 꽤 자세히 적혀있어서 이 부분을 보고 이해하려고 한다.
주석 내용

StoreState represents the state of a Recoil context. It is global and mutable.
It is updated only during effects, except that the nextTree property is updated
when atom values change and async requests resolve, and suspendedComponentResolvers
is updated when components are suspended.

// The "current" TreeState being either directly read from (legacy). It is replaced
// with nextTree when a transaction is completed or async request finishes:
currentTree: TreeState,

// The TreeState that is written to when during the course of a transaction
// (generally equal to a React batch) when atom values are updated.
nextTree: null | TreeState,

// This TreeState exists only during the time that components and observers
// are being notified of a newly-committed tree:
previousTree: null | TreeState,
즉, StoreState는 Recoil context의 상태를 보여주는 타입이다. 여기서 사용되는 프로퍼티로 ‘currentTree’, ‘nextTree’가 존재함을 확인할 수 있다.
계속 주석을 읽어보면 currentTree는 legacy로부터 직접 읽어온 트리 상태를 의미한다고 한다.
currentTree는 transaction이 완료되거나 async request가 완료된 nextTree로 변한다고 한다.
다음으로 nextTree는 atom의 값이 변하는 transaction 과정에서 쓰여지는 treeState를 의미한다.
마지막으로 previousTree는 컴포넌트 혹은 옵저버가 새로 커밋된 트리에 대해서만 일시적으로 존재한다.
이를 통해서 Recoil은 상태를 관리할 때, 업데이트 되는 동안에는 nextTree에 값을 저장하고 완료되면 currentTree를 업데이트 하는식으로 상태를 변화시킨다는 것을 알 수 있다.
따라서 StoreState로 정의되는 부분은 상태 관리를 위한 프로퍼티들을 저장하기 위한 공간으로 생각할 수 있다.
//3. setByAddingToSet
function setByAddingToSet<V>(set: $ReadOnlySet<V>, v: V): Set<V> {
  const next = new Set(set);
  next.add(v);
  return next;
}
setByAddingToSet는 간단하게 기존에 있던 집합에 새로운 값 v를 추가하는 기능을 한다.
//4. recoilValuesUsed
const recoilValuesUsed = useRef < $ReadOnlySet < NodeKey >> new Set();
recoilValuesUsed.current = new Set(); // Track the RecoilValues used just during this render
recoilValuesUsed는 주석에 달려있는 내용과 같이 해당 렌더링 동안 사용되는 RecoilValues를 추적하기 위한 set임을 알 수 있다.
//5. getRecoilValueAsLoadble
function getRecoilValueAsLoadable<T>(
  store: Store,
  { key }: AbstractRecoilValue<T>,
  treeState: TreeState = store.getState().currentTree
): Loadable<T> {
  // Reading from an older tree can cause bugs because the dependencies that we
  // discover during the read are lost.
  const storeState = store.getState();
  if (
    !(
      treeState.version === storeState.currentTree.version ||
      treeState.version === storeState.nextTree?.version ||
      treeState.version === storeState.previousTree?.version
    )
  ) {
    recoverableViolation("Tried to read from a discarded tree", "recoil");
  }

  const loadable = getNodeLoadable < T > (store, treeState, key);

  if (loadable.state === "loading") {
    loadable.contents.catch(() => {
      /**
  _ HACK: intercept thrown error here to prevent an uncaught promise exception. Ideally this would happen closer to selector
  _ execution (perhaps introducing a new ERROR class to be resolved by async selectors that are in an error state)
  */
      return;
    });
  }
  return loadable;
}
다음으로 getRecoilValueAsLoadable를 알아보기 이전에 getNodeLoadable이 무슨 기능을 하는지 먼저 살펴봐야 한다.
// Get the current value loadable of a node and update the state.
// Update dependencies and subscriptions for selectors.
// Update saved value validation for atoms.
function getNodeLoadable<T>(
  store: Store,
  state: TreeState,
  key: NodeKey
): Loadable<T> {
  initializeNodeIfNewToStore(store, state, key, "get");
  return getNode(key).get(store, state);
}
주석을 살펴보면 간단하게 loadable한 노드의 현재 값을 가져오고 상태를 변화시키는 역할을 하는 함수이다.
그러면 상태를 어떻게 변화시킬까? “initializeNodeIfNewToStore”가 어떻게 동작하는지 살펴보자!
function initializeNodeIfNewToStore(
  store: Store,
  treeState: TreeState,
  key: NodeKey,
  trigger: Trigger
): void {
  const storeState = store.getState();
  if (storeState.nodeCleanupFunctions.has(key)) {
    return;
  }
  const node = getNode(key);
  const retentionCleanup = initializeRetentionForNode(
    store,
    key,
    node.retainedBy
  );
  const nodeCleanup = node.init(store, treeState, trigger);
  storeState.nodeCleanupFunctions.set(key, () => {
    nodeCleanup();
    retentionCleanup();
  });
}
initializeNodeIfNewToStore는 store, treeState, key, trigger를 받아서 동작한다.
이미 nodeCleanupFunctions가 key를 가지고 있으면 함수를 종료한다.(이미 초기화된 노드라면 종료한다)
이후, retentionCleanup함수와 nodeCleanup함수를 정의하고 마지막으로 key값을 넘기면서 nodeCleanupFunctions에 key를 넘겨주면서 세팅한다.
즉, 간단하게 정리하면 이미 초기화된 노드라면 함수를 종료하고 만약 아니라면 넘겨받은 파라미터인 treeState로 노드를 초기화하는 과정을 진행한다.
따라서 정리하면 getNodeLoadable에서는 인자로 넘겨받은 state로 노드를 초기화하고 노드의 상태를 리턴해준다.
이후 loadable : Loadable
function useRecoilValueLoadable<T>(recoilValue: RecoilValue<T>): Loadable<T> {
  if (__DEV__) {
    validateRecoilValue(recoilValue, "useRecoilValueLoadable");
  }
  if (!recoilValuesUsed.current.has(recoilValue.key)) {
    recoilValuesUsed.current = setByAddingToSet(
      recoilValuesUsed.current,
      recoilValue.key
    );
  }
  // TODO Restore optimization to memoize lookup
  const storeState = storeRef.current.getState();
  return getRecoilValueAsLoadable(
    storeRef.current,
    recoilValue,
    reactMode().early
      ? storeState.nextTree ?? storeState.currentTree
      : storeState.currentTree
  );
}
따라서, useRecoilValueLoadable은 recoilValue를 넘겨받아서 우선 validation을 거친다.
다음으로 넘겨받은 recoilValue를 키로 이용하여 노드를 nextTree가 있다면 nextTree, 없다면 currentTree로 초기화시키고 loadable을 반환해준다.
자 이제 그럼 마지막으로 useRecoilValue에서 사용된 handleLoadable 함수를 살펴보자.
function handleLoadable<T>(
  loadable: Loadable<T>,
  recoilValue: RecoilValue<T>,
  storeRef: StoreRef
): T {
  // We can't just throw the promise we are waiting on to Suspense.  If the
  // upstream dependencies change it may produce a state in which the component
  // can render, but it would still be suspended on a Promise that may never resolve.
  if (loadable.state === "hasValue") {
    return loadable.contents;
  } else if (loadable.state === "loading") {
    const promise = new Promise((resolve) => {
      const suspendedComponentResolvers =
        storeRef.current.getState().suspendedComponentResolvers;
      suspendedComponentResolvers.add(resolve);

      // SSR should clear out the wake-up resolver if the Promise is resolved
      // to avoid infinite loops.  (See https://github.com/facebookexperimental/Recoil/pull/2073)
      if (isSSR && isPromise(loadable.contents)) {
        loadable.contents.finally(() => {
          suspendedComponentResolvers.delete(resolve);
        });
      }
    });

    // $FlowExpectedError Flow(prop-missing) for integrating with tools that inspect thrown promises @fb-only
    // @fb-only: promise.displayName = `Recoil State: ${recoilValue.key}`;

    throw promise;
  } else if (loadable.state === "hasError") {
    throw loadable.contents;
  } else {
    throw err(`Invalid value of loadable atom "${recoilValue.key}"`);
  }
}
export type Loadable<+T> =
  | $ReadOnly<ValueLoadable<T>>
  | $ReadOnly<ErrorLoadable<T>>
  | $ReadOnly<LoadingLoadable<T>>;

class ValueLoadable<T> extends BaseLoadable<T> {
  state: "hasValue" = "hasValue";
  contents: T;

  constructor(value: T) {
    super();
    this.contents = value;
  }
  getValue(): T {
    return this.contents;
  }
  toPromise(): Promise<T> {
    return Promise.resolve(this.contents);
    // ...
  }
}

class ErrorLoadable<T> extends BaseLoadable<T> {
  state: "hasError" = "hasError";
  contents: mixed;

  constructor(error: mixed) {
    super();
    this.contents = error;
  }
  getValue(): T {
    throw this.contents;
  }
  toPromise(): Promise<T> {
    return Promise.reject(this.contents);
  }
  valueMaybe(): void {
    return undefined;
  }
  promiseMaybe(): void {
    return undefined;
  }
  //...
}

class LoadingLoadable<T> extends BaseLoadable<T> {
  state: "loading" = "loading";
  contents: Promise<T>;

  constructor(promise: Promise<T>) {
    super();
    this.contents = promise;
  }
  getValue(): T {
    throw this.contents;
  }
  toPromise(): Promise<T> {
    return this.contents;
  }
  valueMaybe(): void {
    return undefined;
  }
  promiseMaybe(): Promise<T> {
    return this.contents;
  }
  //...
}
마지막으로 handleLoadable에서는 넘겨받은 loadable에 값이 존재한다면 해당 값을 리턴한다.
타입을 확인해보면 loadable.state === “hasValue”를 만족시키는 타입은 $ReadOnly<ValueLoadable
아직 로딩중이라면 storeRef에서 getState를 이용해 suspendedComponentResolvers를 호출한다.
이후, 로딩이 끝난 이후 처리된 resolve를 추가해준다. 만약 이외의 에러가 발생하면 에러 핸들링을 해준다.
즉, useRecoilValue는 getNodeLoadable 함수를 이용하여 넘겨받은 새로운 treeState로 노드를 초기화한다.
이후 loadable을 넘겨받게되면 여기서 타입 검사를 진행한 이후, 해당 노드의 contents에 저장되어 있는 값 (ValueLoadable<T\>의 contents는 T이다.)을 리턴하는 식으로 동작한다.
위 로직대로 진행된다면 loadable의 key로 전달되는 것은 무엇인가?
const item = useRecoilValue(itemSelector)와 const item = useRecoilValue(itemState)는 key가 다르다.
왜냐하면 전달되는 getRecoilValueAsLoadable에서 {key} : AbstractRecoilValue
AbstractRecoilValue 타입은 아래와 같다.
class AbstractRecoilValue<+T> {
  key: NodeKey;
  constructor(newKey: NodeKey) {
    this.key = newKey;
  }
  toJSON(): { key: string } {
    return { key: this.key };
  }
}
맨 처음에는 이런 생각을 했다.
selector로 정의된 itemSelector의 key가 “itemSelector”이고, atom으로 정의된 itemState의 키가 ‘itemState’라면 itemSelector가 itemState의 상태를 조작한다고 하더라도 다른 값을 바라보는 것이 아닌가?
즉, useRecoilValue로 가져오는 값이 달라지는 경우가 발생할수도 있지 않을까?
하지만, 다시 생각해보니 selector에서 atom을 어떻게 정의하는지에 따라 달라진다.
그냥 새로운 값으로 atom을 변경한다면 동일한 값을 바라보게 된다.
import { atom, selector, useRecoilValue, useSetRecoilState } from "recoil";

const itemState = atom({
  key: "itemState",
  default: [1, 2, 3, 4, 5],
});

const itemSelector = selector({
  key: "itemSelector",
  get: ({ get }) => get(itemState),
  set: ({ set }, newValue) => set(itemState, newValue),
});

function Component() {
  const allItems = useRecoilValue(itemState);
  const evenItems = useRecoilValue(itemSelector);
  const setItemSelector = useSetRecoilState(itemSelector);

  // itemSelector를 통해 상태 변경
  setItemSelector([1]);

  // 변경 후 상태 출력
  console.log("After update allItems:", useRecoilValue(itemState));
  console.log("After update evenItems:", useRecoilValue(itemSelector));

  return null;
}

// After update allItems: [1]
// After update evenItems: [1]
Recoil 훅 중 하나인 useRecoilValue가 어떻게 구현되어있는지 살펴보면서 든 생각은 “이걸 만드려면 어떻게 해야하지?”였다.
우선 하나의 훅을 만드는데도 여러가지 추상화된 기능이 필요하다.
즉, 추상화시킨 함수들이 어떤 타입의 파라미터들을 필요로하는지, 어떻게 사용해야하는지, 어떤 값을 리턴할지도 모두 이해하고 있어야할 것이다.
라이브러리를 만드는 것은 생각보다 쉽지 않을 것이라는 생각이 든다.
(그래도 어느정도 실력이 쌓이고나면 간단한 라이브러리를 만들어보고 싶긴하다. CRUD 기능을 첨가한 Recoil같은?)
다음에 기회가 된다면 set함수도 어떻게 동작하는지 살펴보고 싶다.
생각보다 포스팅의 길이가 길어져서 일단 여기서 마치고 이어서 작성하려고 한다
연관 포스팅 : IMS with TS (version2) 회고록 2